
The SiteGround GoGeek package has a fantastic ” staging ” feature that allows you to test changes on your site before publishing them. I’ve been using staging for years, and I can’t recommend it highly enough. Unfortunately, it’s unavailable with the “StartUp” and “GrowBig” plans – only GoGeek. Here’s a complete list of all SiteGround coupons.
Making changes to a live site is for amateurs or when your blog is new. If you’re starting up, the cost of breaking something isn’t that high – and you don’t have that many visitors anyway. But as soon you start making money, there’s a price tag attached to a misconfigured change. Ideally, you test your changes on a development site before making them live.
But setting up a test environment is challenging.
Trust me – it’s no joke creating a duplicate copy of your site on a local or remote machine and finding the right way to push the changes to production. It requires familiarity with version control, a range of development practices, and many other technical skills that the average business owner does not possess.
SiteGround Staging Makes Things Simple
One of the reasons I love SiteGround is that they have a bunch of geeky features that erase a lot of the hassle of running a site. Setting up a development environment is one of them. The staging functionality lets you create a duplicate copy of your site with which you can safely mess around. You can test all your changes, plugin, theme updates, appearance tweaks, and Javascript without worrying about your site going down.
Here’s what you can do with SiteGround staging:
- Create numerous copies of your site
- Make changes to the copy and push them to production
- Revert a push if something goes wrong
- Create copies of existing staging copies
- Destroy staging copies
Let’s see how to do this step by step without any code or technical knowledge:
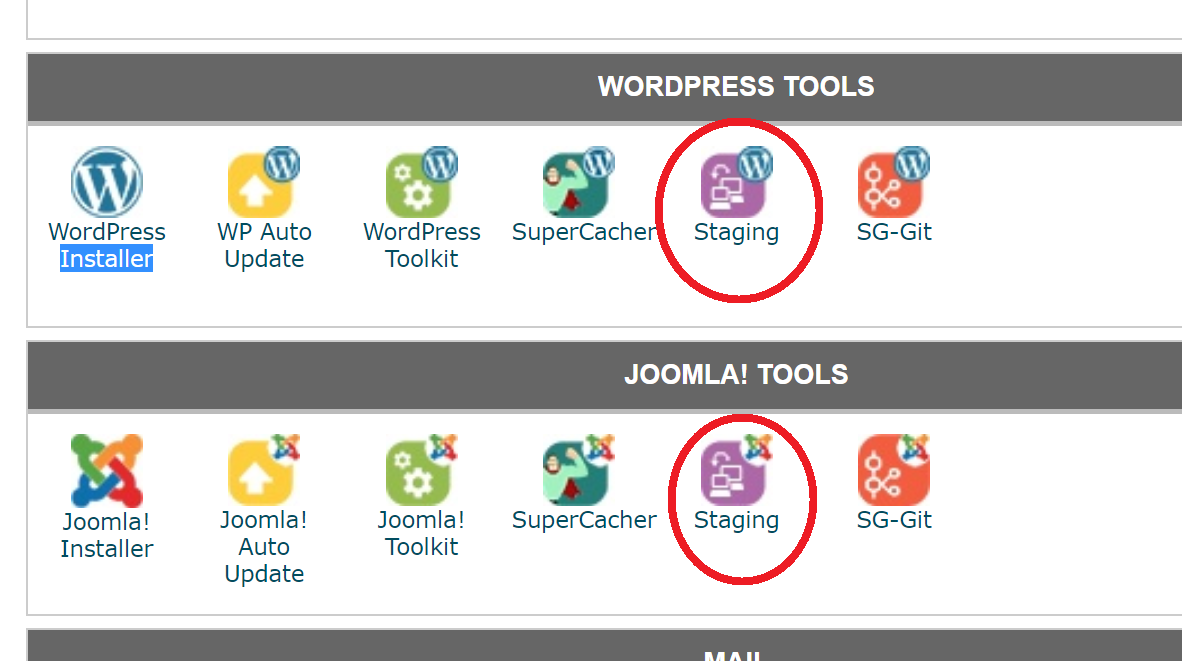
Step 1: Log into cPanel and Find the “Staging” Icon
Log into your SiteGround’s cPanel account. Here are the cPanel login URLs. SiteGround provides staging services for WordPress and Joomla sites. So once you’re logged in, scroll down to the “WordPress Tools” or the “Joomla! Tools” section and click on staging as shown here:
This will bring you to the staging area.
Step 2: Choose Your Site and Create a Staging Copy
If you have multiple sites on the same hosting, they’ll all be shown here like this:

Your site won’t be there if you didn’t create it using the SiteGround installation process. But you can click the “Add WordPress” button on the top right. This will take you to a page where you can specify your installation folder and add it to the list.
Select the site you want to clone and click “Create Staging Copy”.
Step 3: Confirm the List of Files to Exclude
Many WordPress sites have stuff in their root folder that’s not part of the default installations. One example is the Bing webmaster tools verification file. There are plenty of others. By default, SiteGround will leave these out of the staging copy:
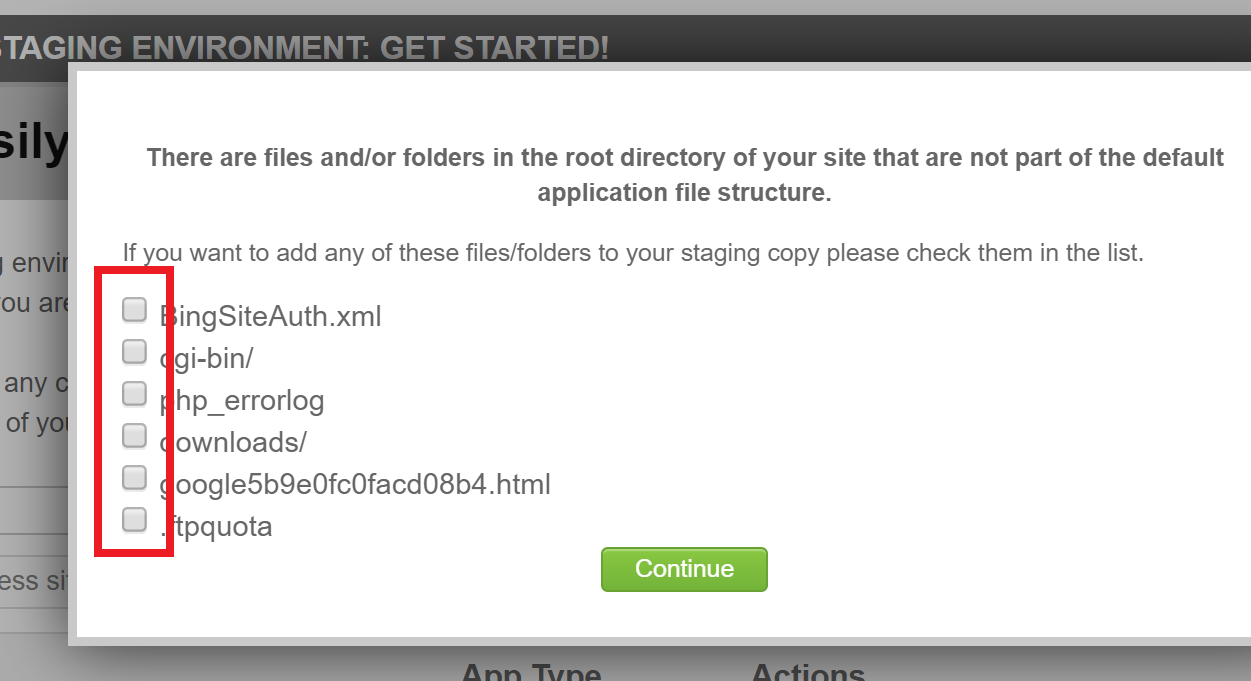
If you want, you can place a checkbox next to the files you want to include. In general, you can ignore them, so leave them blank.
Step 4: Choose a Password (Or Not)
Next, you’ll be asked whether or not you want to set a password for the test site:
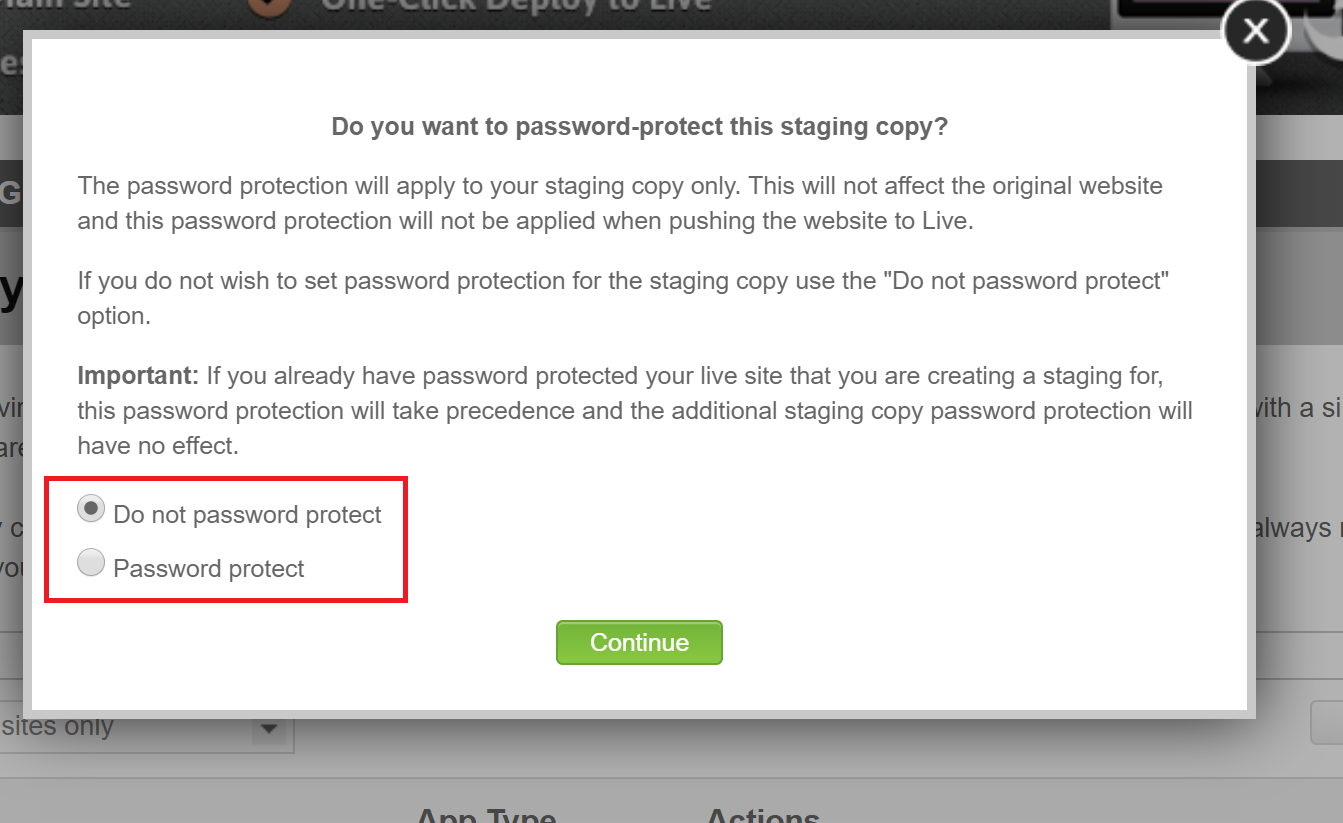
It’s up to you to decide whether or not you want to protect your staging site with a password. There are pros and cons:
Pros:
- More secure (obviously) – no one can access your development site
- Won’t be indexed by search engines since a password protects it
Cons:
- Can be a pain if it’s just a short-lived copy (and it should be)
As a rule of thumb, if you feel that your staging copy will be around for a while, it’s a good idea to protect it with a password. But in general, these copies don’t last long so a password might be overkill. In either case, set a password or move on.
Step 5: Create the Staging Copy and Test the Site
Once you’ve set your password, the SiteGround staging copy will be created. There’s a lot to do. All databases and files need to be mirrored to the new location so give it some time to complete. Once it’s done, you’ll see the staging copy screen like this:

Staging copies are numbered, starting with 1. You can access the admin panel of this copy by clicking the “Admin Panel” button. The staging copies have URLs that look like this:
staging1.example.com
staging2.example.com
staging3.example.com
etc...
You can see here that I’m able to access my site via the first URL:

Also note how the SSL certificate is carried over!
Warning: I recommend accessing the staging copies in your browser’s “Incognito” mode. If you don’t, you might face some SSL conflicts and CSS problems as your browser’s local cache conflicts with the new staging site. SSL seems to be an issue – so make sure everything is clean before you proceed!
You can make as many changes as you want to your staging site without worrying about how it’ll affect your main site.
Step 6: Make Changes and Push to Live
After you’ve played around with your SiteGround Staging copy, you can push the changes to the live site. To do this, go back to the staging screen you saw above and click the green “Push to Live” button. This will prompt you for confirmation:
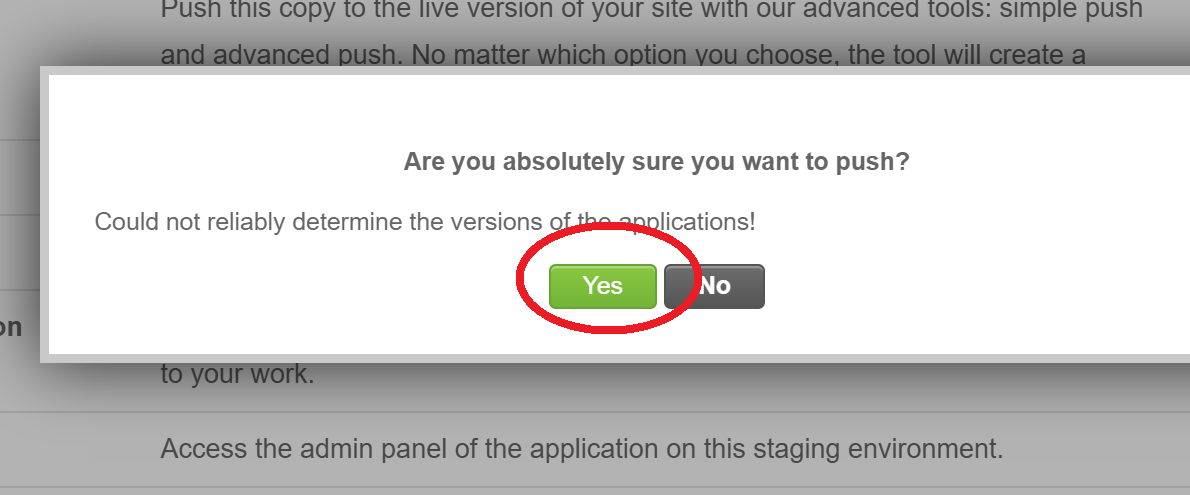
Click “Yes”, and your live site will now mirror the staged site with all its changes. It’s that easy! Once the deployment is complete, you can also roll it back from the same screen. You can also destroy the staging copy if you want.
And that’s how to use SiteGround staging to safely make changes to your site by testing them first. Now some caveats.
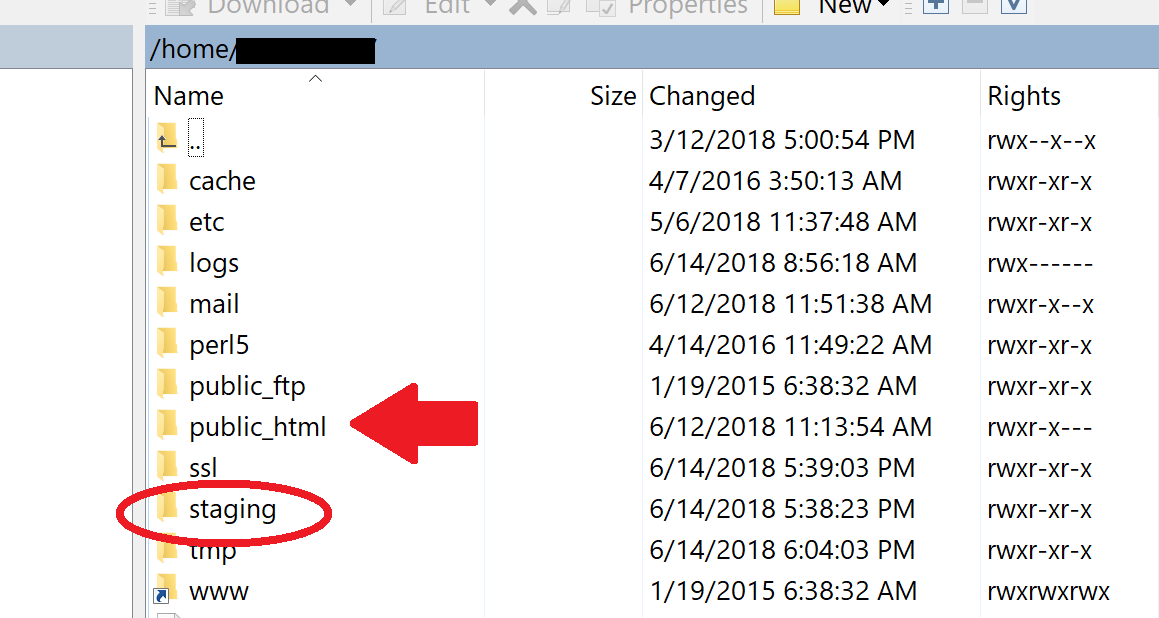
Location of the SiteGround Staging Copy
If you want to access the snapshot via FTP, you must know how to reach it. The “staging” folder is located at the same level as “public_html” as shown here:
Each staging copy has its own folder named as a number. For example, here are the files inside the staging copy numbered “1”:
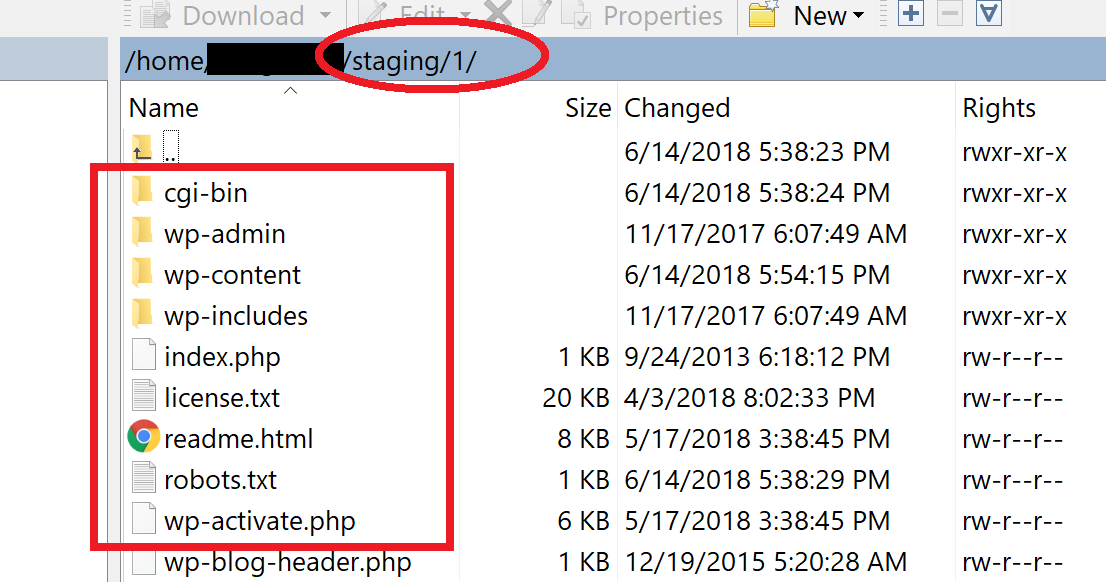
So if you need to make changes to the staging copies plugins etc., this is where to find it.
Warnings and Caveats for the SiteGround Staging Tool
The staging tool is easy to use. Perhaps a bit too easy. Here are a few things to keep in mind.
Don’t Make Changes to your Live Site while a Staging Copy is Active
Remember – a staging site is a snapshot of your live site at a given time. While you’re working on it, make sure to leave your original site untouched! Don’t even publish a post or add a widget.
If you do so, you’ll lose all updates to your live site when you push the snapshot to live! All the posts you’ve made since then will vanish. So remember – while the staging copy is active, leave your site alone!
Keep your Staging Copies Short-Lived
Related to the previous warning, ensure you don’t have copies of your site hanging around willy-nilly. Destroy them as soon as your work is done – and make it fast. Remember that while your staging copy is active, your live site shouldn’t change, including user comments. Websites are dynamic entities and don’t stay static for long.
Keep your snapshots time-bound.
Make your Staging Copy Non-Indexable
Ideally, your snapshot won’t be around long enough to get found and indexed by Google. There’s no way for search engines to find your staging copy without a link pointing to it. But if your staging copy lasts a little longer than usual, hide it from search engines.
You can do this by logging into the staging site’s dashboard, going to Settings -> Reading and placing a checkmark next to the box labeled “Discourage search engines from indexing this site”. That should do the trick.
With these warnings out of the way, you’re ready to go nuts with this fantastic tool from the good folks at SiteGround. They’ve taken what was previously a complicated and messy process and made it as foolproof and easy as possible. A pity it’s only available with the GoGeek plan, but at $7.99/month with a 80% discount, it’s still a pretty attractive deal!
since setting up a staging site on siteground i cannot update the function.php to do some testing. when i copy the live site php it works, but when i update via ftp it gives an error at the line where the original php stops. stieground do not seem to know what the problem is. Does anyone know what may cause this. the live site works perfectly.
That’s wierd. Does your original functions.php file end with a ?> symbol?