
In this article, I’ll show you how to transfer a domain from Bluehost – both to another registrar, as well as to another person. The latter scenario might occur when you sell your domain and need to transfer ownership to a 3rd party.
In both these situations, the process is the same with only one difference – for the first one, you don’t have to change your contact details. Since it’s a registrar and web host, you can initiate a Bluehost domain transfer for both purposes.
And now, a step-by-step tutorial on transferring a domain away from Bluehost.
Table of Contents
Step 1: Access the Bluehost Domain Transfer Interface
Log into your Bluehost account. On the left-hand side, click the tab labeled “Domains,” as shown here:
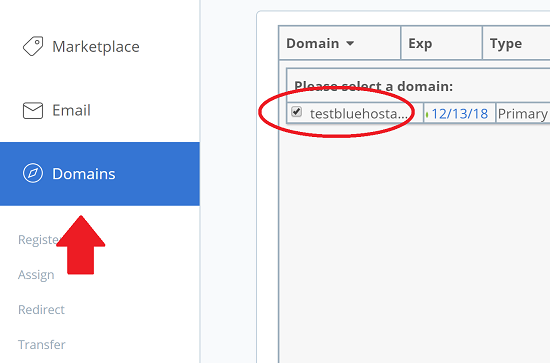
This will bring up a list of domains under your control on the right-hand pane. Place a checkmark next to the one you want to transfer, and it’ll open up the domain transfer options next to it like this:
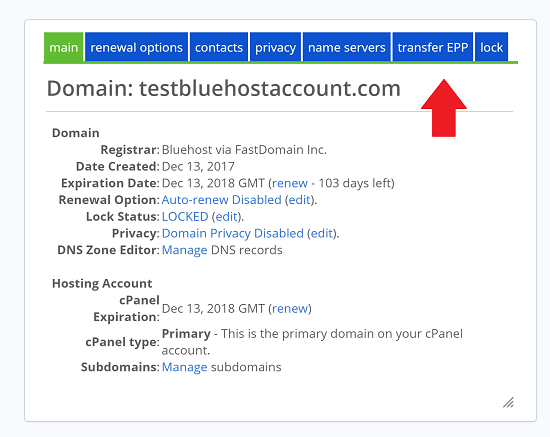
You’ll see several tabs in the domain transfer interface. You’ll need to go through most of them to complete the transfer.
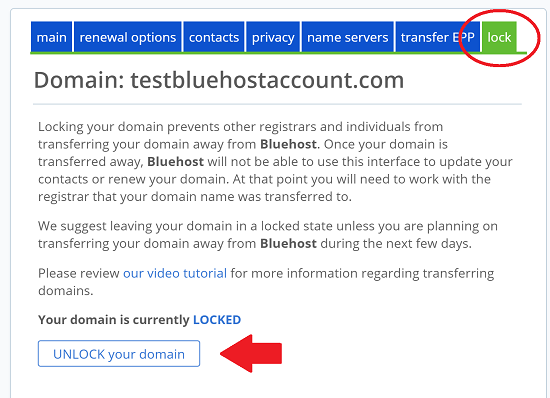
Step 2: Unlock the Domain
By default, the domain you have with Bluehost is locked. This prevents anyone from transferring it away from you – presumably as a security measure. So we need to disable it by clicking the “lock” tab as shown here and then toggling the button labeled “UNLOCK your domain”:
If you’re transferring to another person, you’ll also need to:
- Change the contact details
- Verify the change via email
Step 3: Disable Domain Privacy if Enabled
You can activate domain privacy when you purchase a domain with Bluehost (or get one for free). It keeps your details out of the public WHOIS database. However, you must disable domain privacy to transfer the domain to someone else. This is so the receiving registrar can look up the new owner’s contact details and inform them of the change.
To remove domain privacy, click the tab labeled “privacy” as shown here:
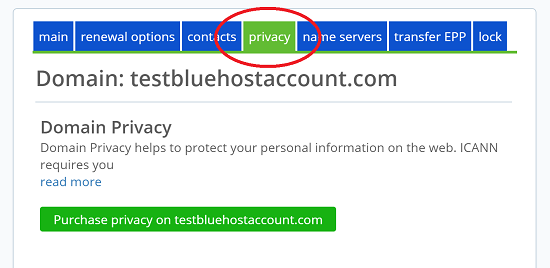
In the screenshot above, I haven’t purchased domain privacy, so I have nothing to do here. But if you have purchased it, this is where to turn it off.
Step 4: Change the Contact Details
This step is only necessary if you’re selling the domain and must modify the contact details to indicate someone else. Changing the details (even to another of your addresses) qualifies as a “registrant change”. The process is as follows:
- You change the contact details
- You receive a verification email on the old contact address with a link to verify
- An email is then sent to the new contact address with a “verify” link
- Only then are the contact details changed, and a “transfer lock” is initiated
To change the contact details, click the “contact” tab in the interface and update the information for all the fields you need.
Bypassing the Transfer Lock
For all gTLDs (Generic Top Level Domains) like com, org, net, and info, registrant changes like contact details automatically create a 60-day “transfer lock”, preventing another such change.
Again, it’s a security measure to protect against spammers and other fraudulent transactions.
However, if yours is a legitimate transfer, you probably want to disable the transfer lock so the recipient can sell it again. A big orange box will appear as soon as you start typing in changes to the contact details, as shown here:
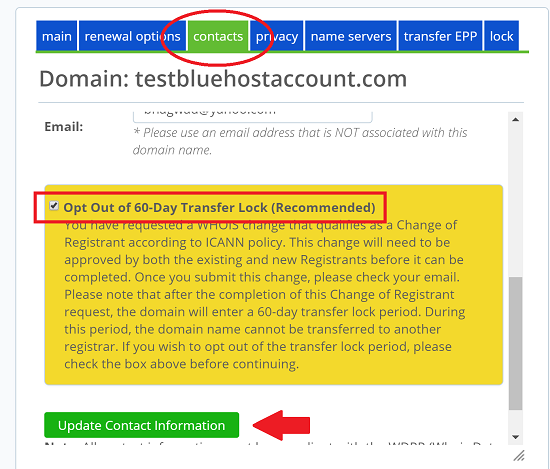
Click the checkbox that says, “Opt Out of 60-Day Transfer Lock (Recommended)”. And only then should you click the green button saying, “Update Contact Information”. If you do this, the new owner can do as they please with the domain as soon as they receive it.
(Optional) Step 5: Change your DNS Servers if Transferring Registrars
While the transfer is in progress, you can’t mess around with DNS entries. To avoid downtime on your site, make your DNS changes pre-emptively to point to a new host.
Step 6: Providing the EPP (Extensible Provisioning Protocol) Code
The final step in the Bluehost domain transfer process is to copy the unique EPP code for your domain and give it to the recipient. This is a unique code required for domain transfers. The person receiving the domain will enter the EPP into their new registrar’s interface and thus initiate the transfer.
You can get the EPP by clicking the “transfer EPP” tab like this:
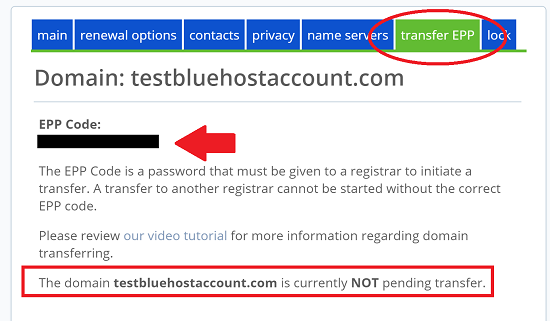
The EPP code is provided, as shown in the screenshot above. Copy this exactly as is and give it to the new owner. If you want to transfer your domain to another registrar, use this EPP when your new registrar asks for it.
(Optional) Approve the Transfer Faster
Domain registrar transfers take a bit of time. There’s a verification period of a few days, and this can be annoying to deal with. To speed things up, go to the EPP tab as before and click the “Approve” button. This will skip the process, and the new owner will receive their shiny new domain in just a few minutes!
And that completes the Bluehost domain transfer procedure from start to finish. I hope you found this guide useful!
Key Steps
Here are the key steps in summary format:
- Unlock your domain
- Disable domain privacy
- Update contact details if transferring to another person
- Obtain and provide the EPP code
Have you recently transferred a domain from Bluehost? Share your experience in the comments below! If you have any questions, feel free to ask.
Speak Your Mind