
You’ll often find custom code snippets on various websites, asking you to paste them into your theme’s functions.php. While this is useful, it’s risky because WordPress will overwrite your code with the next theme update. The standard advice is to create a child theme, and you can read my tutorial on creating child themes here. But then your code will not carry over if you change your theme itself. Many code snippets provide general functionality and are not specific to a particular theme. A better solution is to create a WordPress custom plugin of your own to hold all your custom code.
This way, your changes will be preserved through theme updates, as well as theme changes. Moreover, it makes logical sense to separate custom code from the theme, since the two typically have very little to do with each other. A WordPress custom plugin will neatly abstract all your changes and make them future-proof. Here’s how to go about it.
To make things easy, I’ve done the hard work for you and created a blank plugin, ready to accept all your custom code. Here’s how to install it.
Step 1: Download the Custom Plugin
Download the custom plugin from here. It’s just a zip file with one folder and one directory.
Step 2: Install it in your WordPress Site
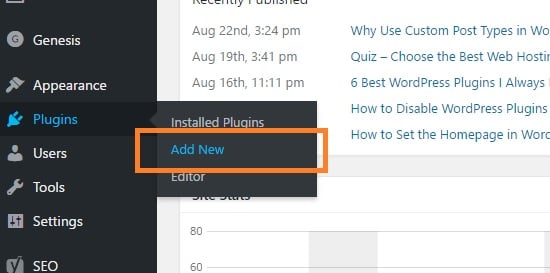
To upload a custom plugin, you don’t need FTP – you can do it directly from the WordPress administration dashboard. On the left-hand side, click “Add New” under the “Plugins” menu:
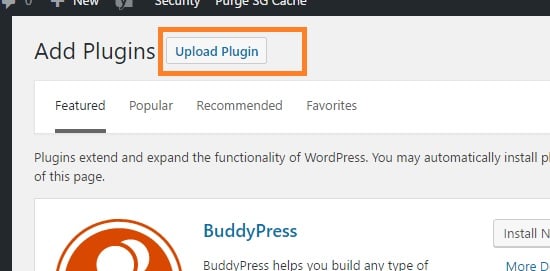
This will bring you to the page with a list of WordPress-hosted plugins. Since we’re going to upload our own, click the button “Upload Plugin” at the very top of the page:
Click the “Choose File” button and select the zip file we downloaded earlier:
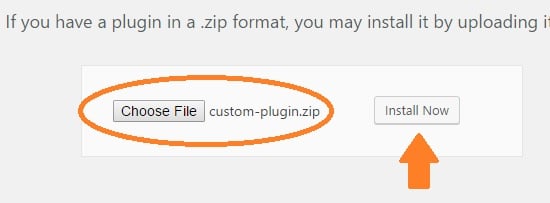
Once done, choose “Install Now” and activate the plugin when it asks you to. That’s it – you’re done! You’ve installed your own WordPress custom plugin for code.
Step 3: Add Code to your Custom Plugin
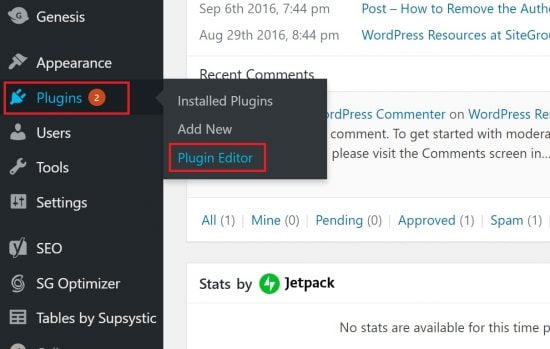
Update: This tutorial has been updated to reflect the WordPress update that disabled direct plugin editing. These are new screenshots to guide you through the new process.
Once you’ve installed it, adding custom code is easy. Simply click the “Plugin Editor” link on the left-hand side of the WordPress dashboard under the “Plugins” menu item as shown here:
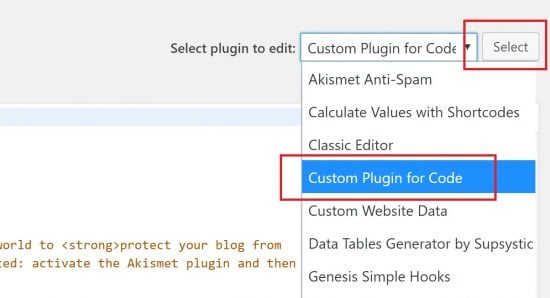
Now choose the plugin we just uploaded from the drop-down menu and click select:
This will bring up the main plugin file for editing – there’s just one in any case. Your custom code goes under the section with the plugin name and description as shown here:
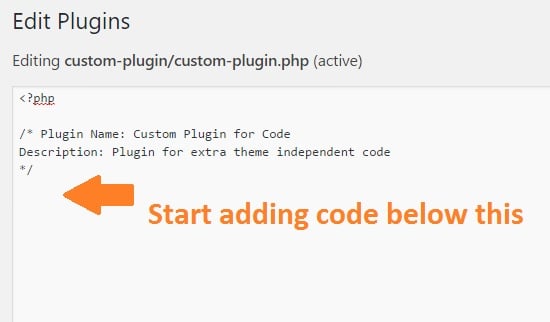
Once you’re done, save your changes and your custom code will be active on your site.
Further Benefits to a WordPress Custom Plugin
Apart from abstraction and future-proofing, there’s yet another benefit to using a custom plugin instead of functions.php. And that’s error handling. If you accidentally make a syntax error in your code or some other mistake, WordPress will simply deactivate your custom plugin after you save it with an error message like this:
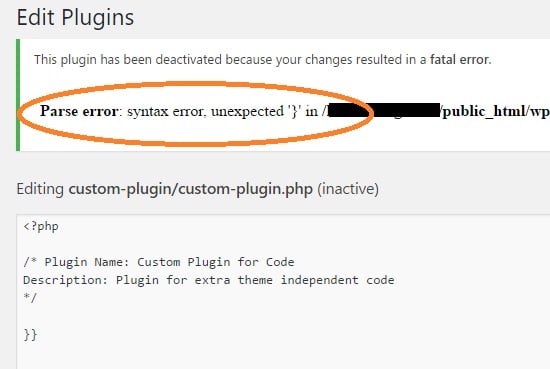
In the above example, I’ve deliberately made a syntax error by typing }} in the custom plugin. As you can see, WordPress handles this gracefully by chiding me with an error message and disabling it. If this had been a functions.php error, your WordPress site would have broken with the famous “White Screen of Death” and you’d have to use FTP to access functions.php and get out of the mess.
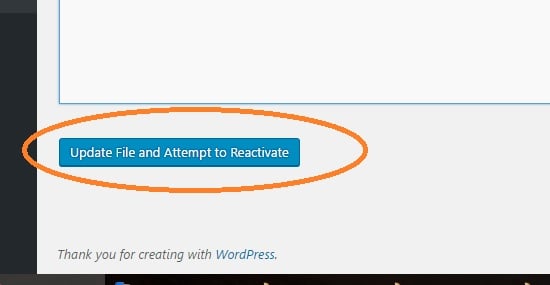
With a custom plugin, you can correct the error and WordPress will automatically attempt to re-activate the plugin if it solves the problem:
So compared to functions.php, a custom plugin is much safer. As a result, I’ve hardly had any “white screen of death” problems ever since I moved to a plugin-based approach to custom code years ago.
The second benefit is that you don’t need to create a child theme! You can make all modifications in the plugin itself and you can use an external CSS solution like Jetpack to hold your custom CSS. Since it’s much more difficult for you to create a child theme than merely uploading a ready-made plugin like in step 1, I feel that it’s a superior approach to custom code.
Note on PHP Tags in Plugins and functions.php
You may have noticed that there’s no closing ?> PHP tag in my custom plugin file. This is an accepted best practice to leave it out of functions.php and plugin files. The reason is that its presence can give rise to complications if you accidentally leave a new line or blank space after it. And such errors are notoriously hard to debug. So to prevent all that, I don’t use a ?> closing tag at the end of my code.
I hope I’ve convinced you that placing custom code in functions.php is a bad idea. A plugin provides you with much more flexibility and abstraction. And it keeps your site from crashing as well! What’s not to like?
Hello, after installing “Custom Plugin for Code” I see no option for edit, only for disable. What I have to do to have possibility to edit this plugin?
It could be a permissions issue. Are you the site owner or administrator?
I am having the same problem. No way to edit the plug in. I don’t believe it is a permissions issue. Help?
Although I’m new to WP, I believe that the interface has changed. What you now need to do is is select “Editor” from the “Plugins” main side menu. It will give a warning about the dangers of changing the code, but once you accept and go forward you will be presented with the text editor. It will default to the first Plugin in the list, so go to the “Select plugin to edit:” drop-down in the upper right-hand area. Choose the “Custom Plugin for Code” and click the SELECT button. You should then see the plugin code in the editor.
You piss me off a bit. You do not mention the plugin needed for inserting the code in the article.
Instead I find someone asking about it in this comments section.
Then I decide to download a plugin from a random site and not the official WP plugin library. This I would generally not do since it is a SECURITY RISK ! And when testing it out it has no EDIT button as you instructed us to click ! Article somewhat helpful but the secret must have plugin didnt even have an edit button. That makes paranoid me wonder what you have done to my site !?
Actually, you’re right. Since the time I originally wrote this article, WordPress has changed the way we edit plugins. I’ve updated the article to reflect the new process. Sorry for the outdated info!
You can find the updated method in Step 3.
Hi,
Correction:
I found that the comments on this page had a solution to using the plugin.
My previous comment above was supposed to be on this page:
https://www.wp-tweaks.com/hackers-can-find-your-wordpress-username/
It works but a little confusing getting the information correctly.
Thank you
Hello,
Just added the plugin and edited it with the suggested snippet to prevent revealing my WordPress user name. However, it doesn’t do the trick. The code used is the following one. Am I doing something wrong? Thanks
function redirect_to_home_if_author_parameter() {
$is_author_set = get_query_var( ‘author’, ” );
if ( $is_author_set != ” && !is_admin()) {
wp_redirect( home_url(), 301 );
exit;
}
}
add_action( ‘template_redirect’, ‘redirect_to_home_if_author_parameter’ );