
Follow these steps to add Google Analytics 4 (GA4) to Google Tag Manager (GTM).
Table of Contents
Prerequisites to Add GA4 to GTM
In the steps below, I’m assuming that you’ve already done the following:
- Set up a Google Analytics 4 account for your website
- Set up Google Tag Manager and added the code to your site
1. Get the Measurement ID in Google Analytics 4
In the old Google Analytics, you had to use your tracking ID for everything, which was easy to find. In Google Analytics 4, however, you must use a “Measurement ID” instead of the tracking ID. Here’s how to find it.
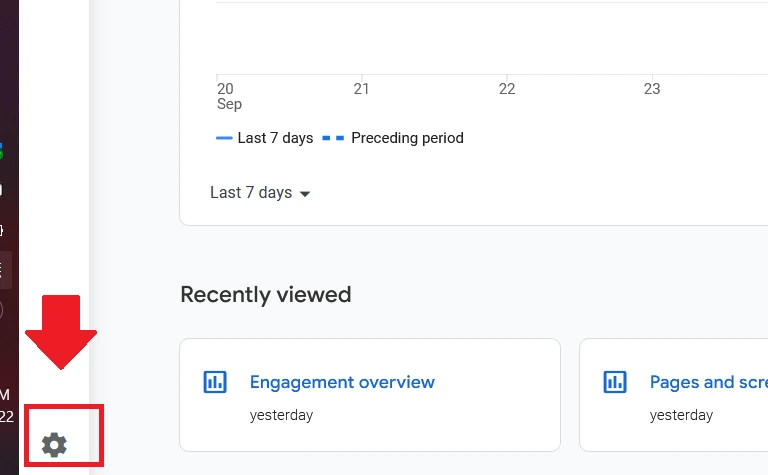
Log into the Google Analytics 4 interface for your website and click the Admin icon on the bottom-right as shown here:
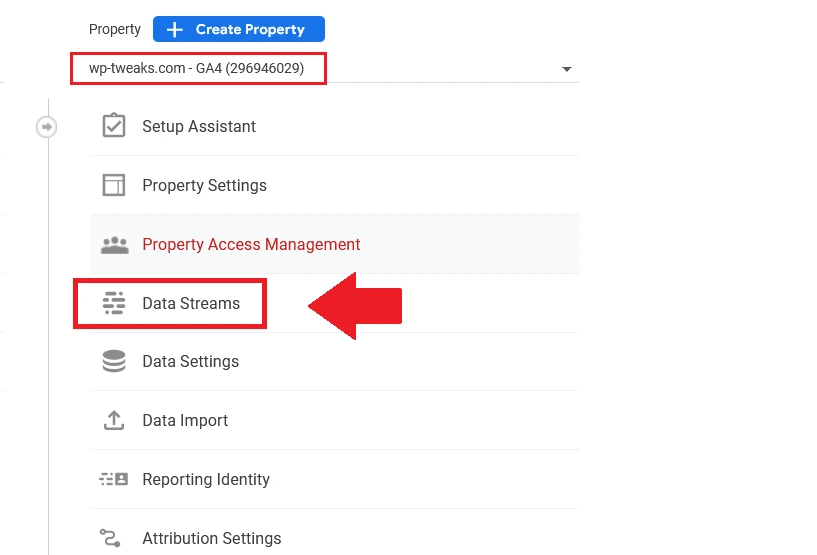
On the next screen, under the “Property” column, select your website and click “Data Streams,” as seen in this screenshot:
Next, you’ll get a list of data streams for your site. If you’re like most people, you have just one. Click to expand it:

This will open the screen containing the Measurement ID on the right-hand side, as shown here:
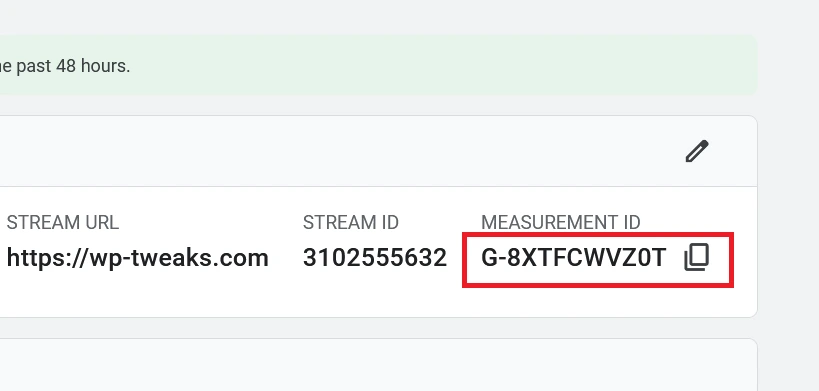
Make a note of this measurement ID. We will need it in the next step when we add Google Analytics 4 to Google Tag Manager.
2. Insert a Google Analytics 4 (GA4) Tag in Google Tag Manager
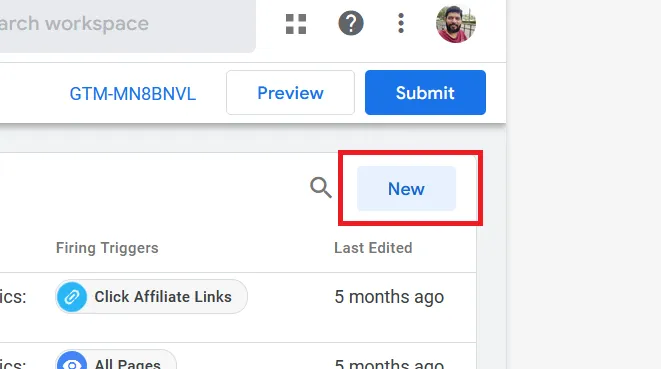
Log into Google Tag Manager, and click the “Tags” link on the right-hand side, then select “New” like this:
On the next screen, click the space for creating a new tag, and choose the Google Analytics: GA4 Configuration tag as in the screenshot:
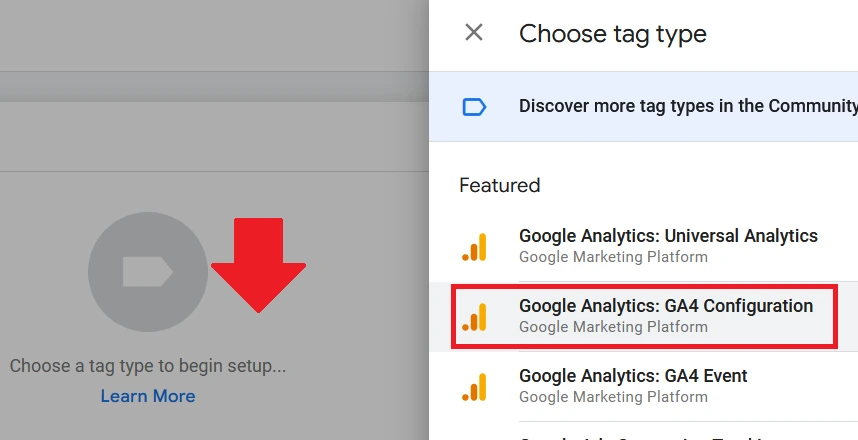
This will add the Google Analytics 4 tag to Google Tag Manager.
3. Paste the Measurement ID into the Google Analytics 4 Tag
On the configuration screen, paste the measurement ID you obtained in step 1 into the box provided as shown here:
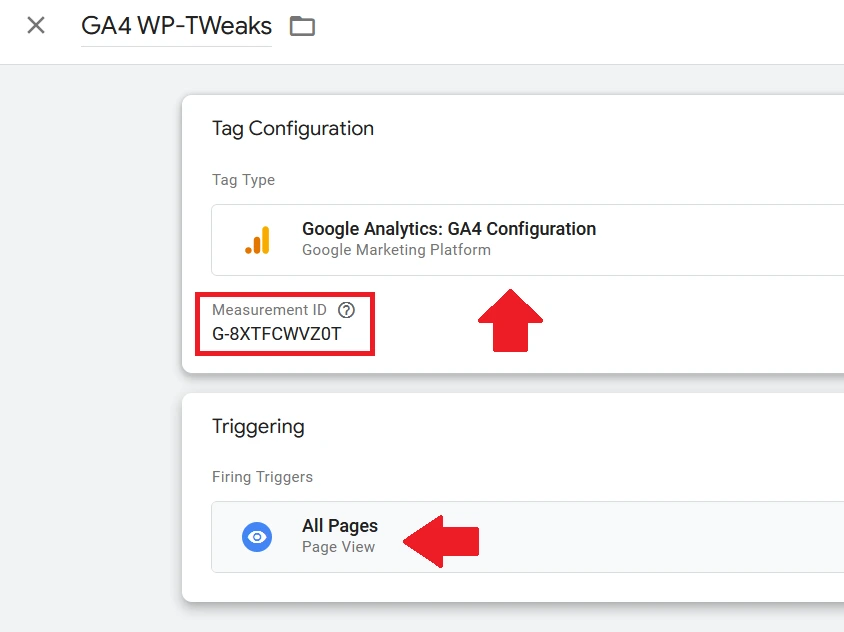
For basic use, you can ignore advanced fields like “Fields to Set”, “User Properties,” and “Advanced Settings”.
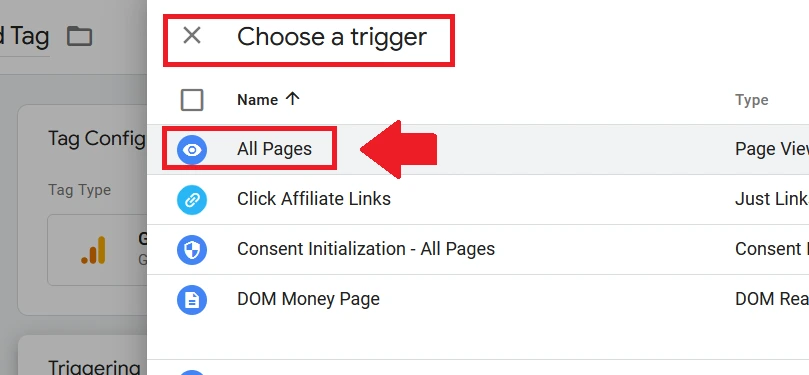
4. Create a Trigger for “All Pages”
Google Tag Manager uses the “trigger” to determine when to include the tag. For a new tag, click the blank “Trigger” space below the tag configuration, and under “Choose a Trigger”, select “All Pages,” as shown here:
This will include the tag in all the areas where you’ve pasted the Google Tag Manager code. For an application like WordPress, this means every publicly visible page. It’s problematic because it also tracks logged-in users. You can exclude logged-in users using GTM and Google Analytics if you want.
Save the changes to your tag.
5. Submit and Publish Your Changes to Google Tag Manager
Your changes won’t go live unless you submit and publish them. Before publishing, you can add a short description so you have a record of your modifications. It’s not necessary, but it helps.
Once you publish your new tag, the linked Google Analytics 4 property will start receiving data from Google Tag Manager.
Google Analytics 4 Delay in Reporting
Right now, there’s a lot of delay between when Google Analytics 4 receives data and when it shows up in reports. I’ve experienced a delay of up to twelve hours. I don’t know if this will improve in the future, but it’s good to know because you won’t be able to generate reports immediately. It’s hard to believe that Google Analytics 4 is so bad, but Google has a track record of releasing poor versions of already great products.
However, the “real-time” metrics work instantly. So, check the real-time report if you want to verify that GA4 is receiving data from Google Tag Manager.
Next Step: Track URL Click Events on Google Analytics 4
After you’ve added Google Analytics 4 to Google Tag Manager, it’s time to set up event tracking. Here’s a tutorial on how to track URL clicks by setting up a new GA4 event in Google Tag Manager. I hope you find it helpful!
I love these articles on GA ad GTM, but very frustrating. The screen shots are missing in several places and dont download. In this article the last screenshot in step 1 is missing and all the ones after that. This is the second article that has been missing screenshots.