
This tutorial will explain how to configure Google Tag Manager (GTM) to exclude logged-in WordPress users from triggering the Google Analytics tracking code. It assumes you have already:
- Set up Google Analytics 4 – GA4
- Added GA4 to Google Tag Manager
Here, I will only show you how to prevent the Universal Analytics tag from firing when a logged-in WordPress user visits the site. Let’s get started!
Table of Contents
Step 1: Log into GTM and Create a new Variable
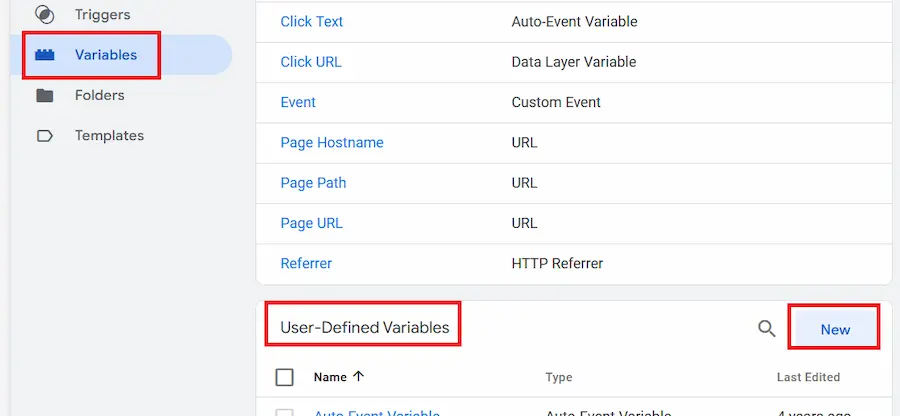
Sign in to your tag manager account, and go to “Variables” on the left-hand side of the screen. Then click “New” as shown here:
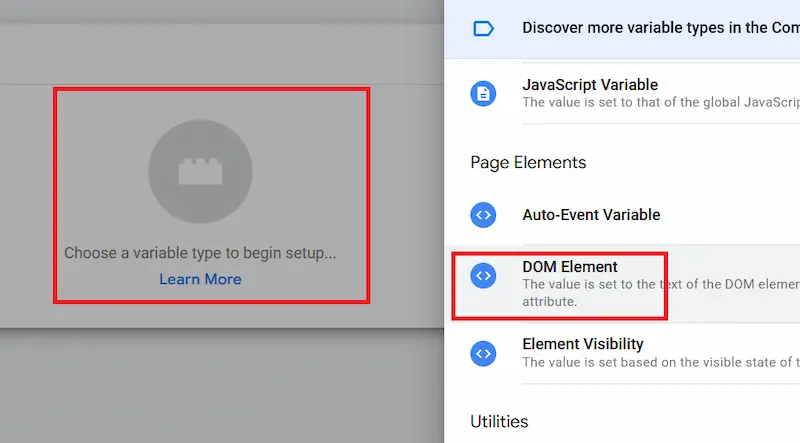
This will bring up the following screen. Click “Choose a variable type”, and a list of variables will fly out from the right-hand side of the screen. Scroll down till you reach the sub-heading “Page Elements”. Then click “DOM Element” like this:
Then do the following:
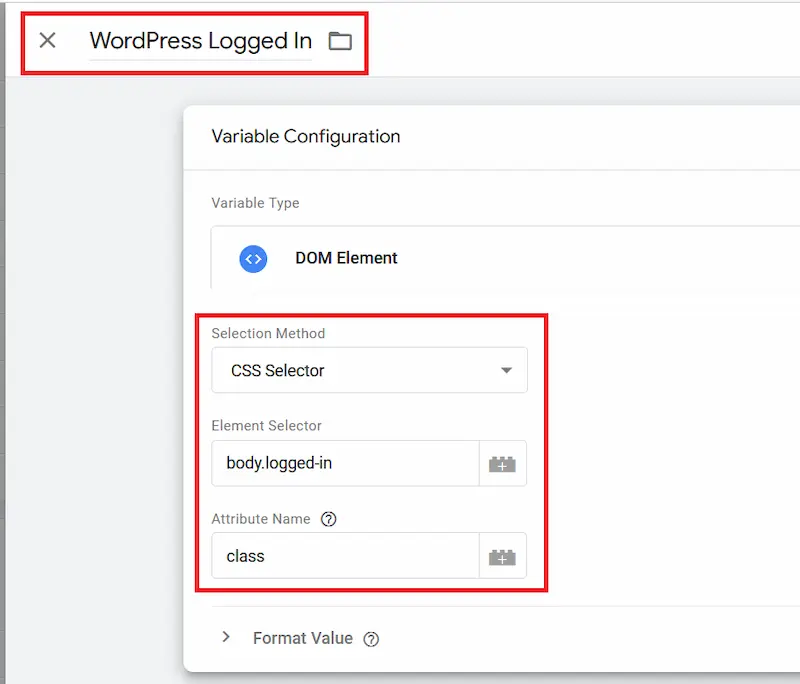
- For “Selection Method”, choose “CSS Selector”
- Under “Element Selection”, type “body.logged-in”
- Under “Attribute Name”, type “class”
Here’s a screenshot to show you the settings:
Save your changes, and you’ve created a new variable!
Step 2: Create a “Not Logged into WordPress” Trigger
On the left-hand side of Google Tag Manager, click “Triggers” and create a new Trigger called “Not Logged into WordPress” with the following configuration:
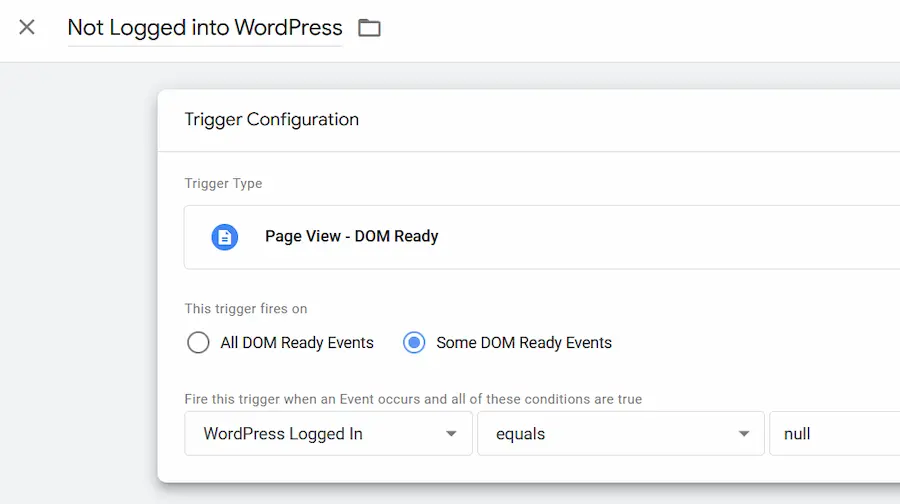
Under “Trigger Type”, select “Page View – DOM Ready”. This will ensure that the trigger will fire only after the HTML has been rendered. Select “Some DOM Ready Events” and select the “WordPress Logged In “variable we created in step 1, where it says:
“Fire this trigger when an Event occurs and all of these conditions are true”
Select “equals” and type “null” in the following box. This means that the “body.logged in” CSS selector wasn’t found, implying that the user isn’t logged in.
Step 3: Modify the GA4 Tag in GTM
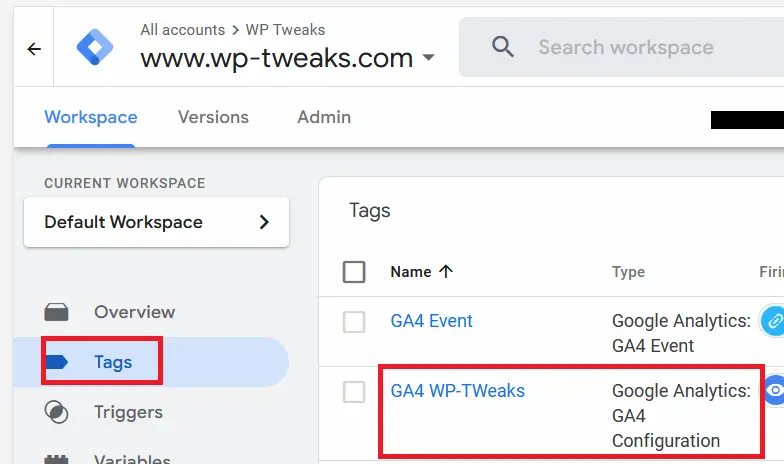
Next, head to the list of tags in GTM and click the tag you already have for GA4, as shown here:
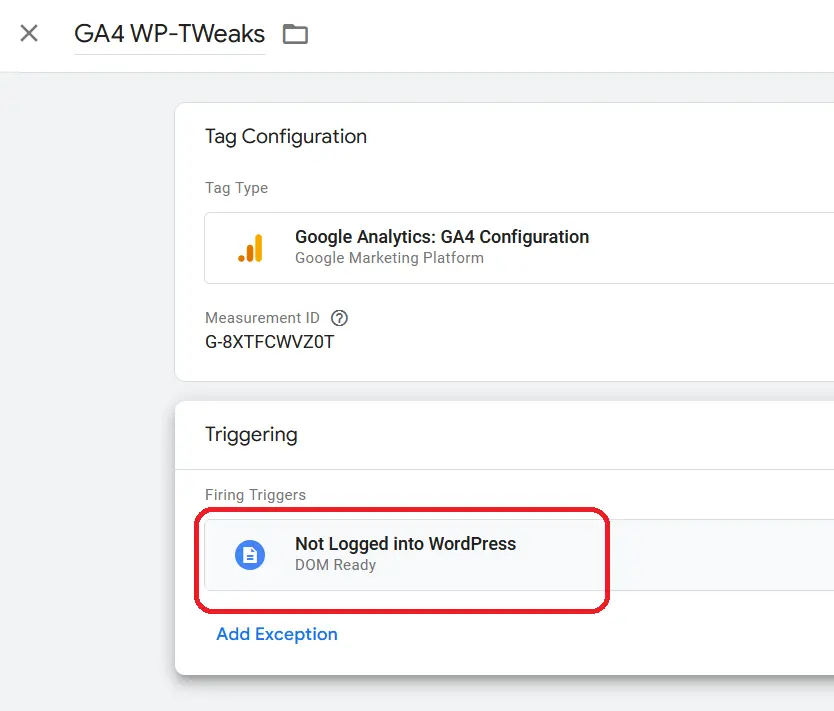
In the tag configuration, modify the trigger at the bottom to “Not Logged into WordPress” that we created in step 2, as shown here:
Save the changes to your GA4 tag.
Don’t Forget to Publish your Changes!
Many people miss this final step. Don’t forget to submit and publish your changes. Without this, GTM won’t load your new trigger and tags.
How This Works
Before we go into testing, let me explain what we just did. Whenever you visit your website as a logged-in user, WordPress inserts a class attribute into the page’s body tag called “logged-in”. See the screenshot:
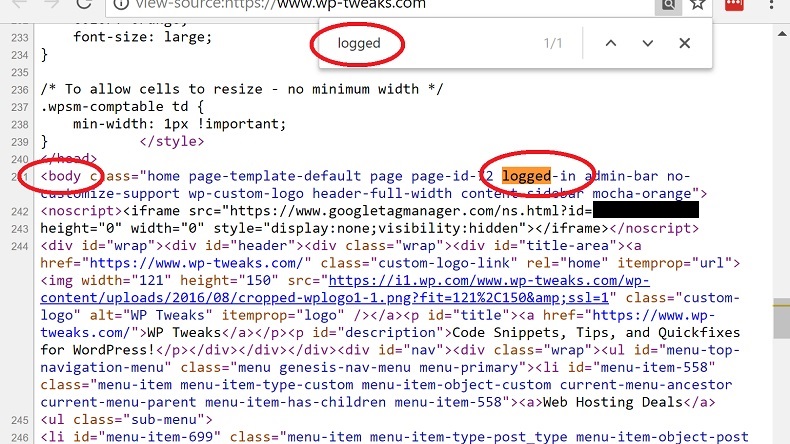
This class value is absent when a regular visitor lands on any WordPress page or post. If by some chance your theme has modified this, then this solution will NOT work for you. You’ll have to use PHP code to output unique HTML when the user is logged in – it shouldn’t be difficult. An action hook with the “is_user_logged_in” function to insert a bit of unique HTML should be sufficient.
And, of course, you’ll need to change the “Element Selection” value in Step 1.
But most of the time, this won’t be necessary. Hardly any theme would change the default classes supplied by WordPress and replace them with something else.
So our tag variable checks for the existence of the “body.logged-in” class. If it doesn’t exist, it returns the string “null”. Otherwise, it outputs the entire contents of the “class” attribute. I filled in the “Attribute Name” field to class because otherwise, the variable would take the value of the entire post text. And that would be very inefficient!
Finally, we tell Google Tag Manager to trigger the Universal Analytics code on DOM events. But only SOME DOM events. We tell it to trigger only when the value of the variable we created is “null”. This means the “logged-in” class value is missing, and the user isn’t logged in. And so it fires only for regular visitors and not for users!
Nifty eh? Before we publish our changes, let’s test them and see if they work.
Testing if our Changes to GTM Work
Step 1: Disable Cloudflare
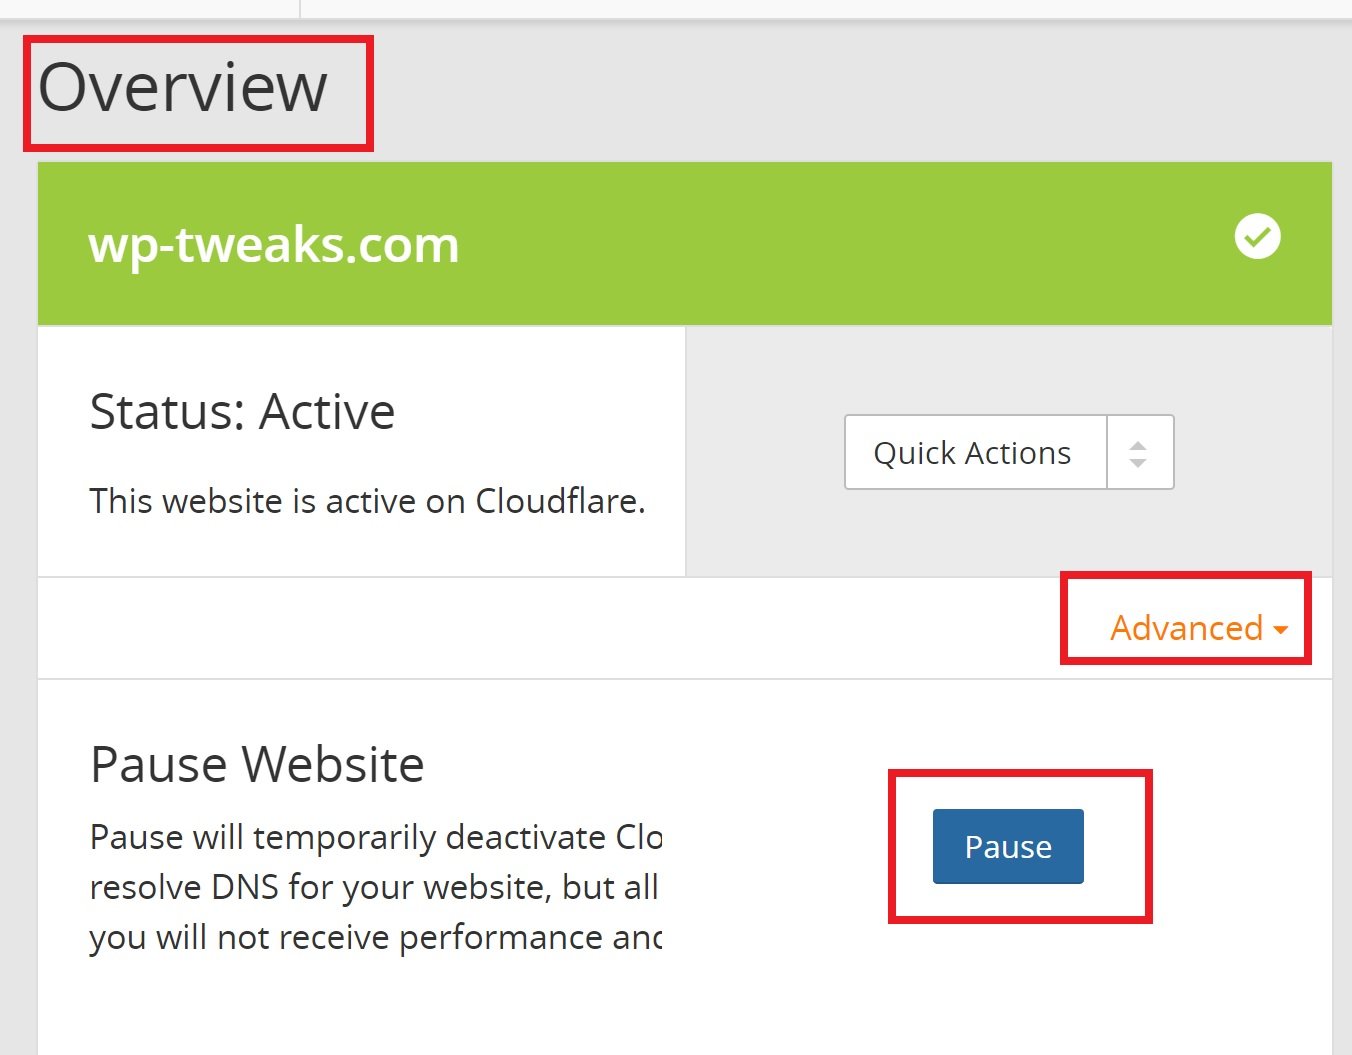
This took me a long time to figure out. Most of us use Cloudflare to speed up our site. But to enable the preview mode of Google Tag Manager, you need to pause it temporarily. To do this, go to the Cloudflare dashboard, and choose “Overview”. From there, click the “Advanced” link and then hit the “Pause” button as shown here:
This will temporarily pause Cloudflare until you re-enable it. But your browser probably hasn’t realized it yet and still caches a lot of stuff. Everyone tells us to press “Ctrl+shift+R” to clear the cache, but it never works. At least it’s never worked with me.
It would help if you opened up a window in your browser’s Incognito mode after waiting a minute or so. Fire up your website and view the source code. Cloudflare is still working on your site if you find any references to the “rocket” script. Keep opening Incognito browsers with Cloudflare disabled until you no longer see the phrase “rocket” in your site’s source code.
Step 2: Enable the GTM Preview Mode
Once you’re sure your site is uncached, sign into your WordPress site in Incognito mode. Now visit a page that you want to test.
Next, go to the Google Tag Manager and click the “Preview” button as shown here:

This will bring up an orange bar that sets GTM in preview mode. It allows us to debug our changes before they go live. When preview mode is enabled, reload your website page in another tab next to GTM. You should see a Google Tag Manager window open up below it.
Step 3: Test if Our Variable is Working to Exclude Logged in WordPress Users
Since you’re logged into your site, you should see the following under the “Summary” section of the GTM window:
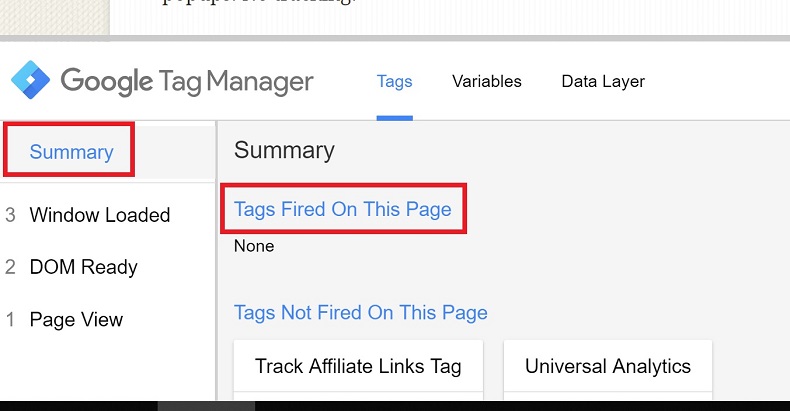
Under “Tags Fired On This Page”, it should say “None”. Now go to the “DOM Ready” section and click the “Universal Analytics” box:

Click the “Tags” tab. Now scroll down till you reach the section “Firing Triggers”. As you can see below, the “Page has Loaded” trigger has a red cross next to it – meaning that it has not fired.
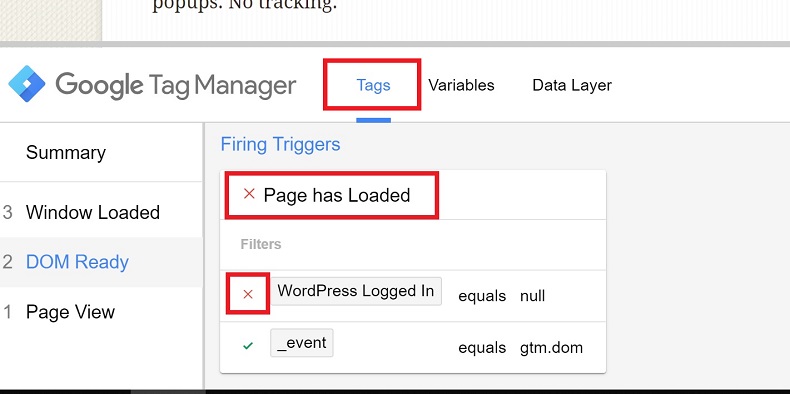
This is because the “WordPress Logged in Variable” is false – also evidenced by the red cross next to it. Since our condition is that it should be “null”, a red cross means it’s NOT null. Therefore, we are logged in, preventing the tag from being fired.
We can further test this by clicking the “Variables” tag. Scrolling down, we see that the “WordPress Logged In” variable has some value. In other words, it’s not null.
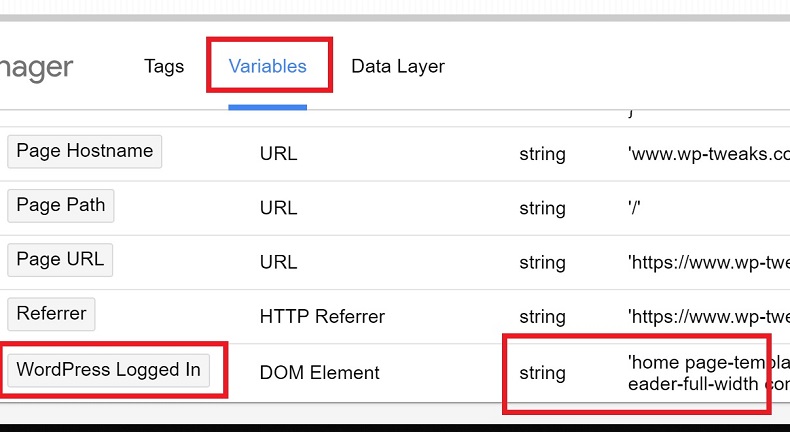
So the tag wasn’t fired!
Step 4: Re-enable Cloudflare
After your testing, don’t forget to re-enable Cloudflare!
Wrapping Up
And that’s how we exclude logged-in WordPress users from being tracked with Google Tag Manager. The Google Analytics tag only fires when missing a specific variable for logged-in users. I hope you found this tutorial useful and easy to follow!
This was very helpful. Suggestion – it’s important to Publish the change and save a version after making these changes or they won’t take effect.
I was trying to exclude my own visits from GA without using the “exclude IP” method but couldn’t find any articles that had easy-to-follow instructions. I was getting frustrated until I came across your article. THANK YOU SO MUCH
You’re welcome 🙂
Exactly what I needed, and it works like a charm! Thank you very much for this very clear and well written article.
For me, the question was not to exclude all registered users but only part of them (the project team members), namely “administrators” and a certain type of Buddypress users called “hidden_members” (such as persona for testing purpose). So I used exactly your technique and just added this little piece of code in my function.php file:
//******************************************************************************************************
//*** Add class in body tag for admins and hidden members (used for excluding them from GA analytics in GTM)
//******************************************************************************************************
add_filter( ‘body_class’, function( $classes )
{
global $user_ID;
if( is_admin() or current_user_can(‘administrator’) or bp_has_member_type( $user_ID, ‘hidden_member’ ) )
{
$classes = array_merge( $classes, array( ‘s4s-team-member’ ) );
}
return $classes;
} );
Of course, the test can be replaced by any other one and so is the added class name.
Thanks again for this very elegant and simple solution!
Yves.
I’m glad you found a solution that works for you!
Extremely helpful tutorials. It seems like it’s working on my end. I have to yet check if it’s working as it is supposed to when I launch the site. Thanks a lot, Bhagwad
Would this still work if we kept the “All Pages” firing trigger and added an exception trigger that is configured as described in this article? Essentially the tag would then have:
Firing Trigger: All Pages
Exception Trigger: Page View – DOM Ready (as per this article)
Thanks
Sascha
Try and see! Let me know if you manage to make it work 🙂
I prefer to use exception triggers. I set this up a little differently. For the “LoggedIn” DOM variable, I put “body” as the selector. For the trigger, I configured a Pageview with some some pageviews, “LoggedIn” contains “logged-in admin-bar” and then, I added this exception to the universal GA tag. This worked.
This was so helpful. Thank you very much!
You’re welcome! I’m glad you found it useful 🙂
This is the best method, other articles wanted me to install an additional plugin, or insert code. Genius using the CSS selector like you. I also learnt something new about GTM. So many powerful features, and not much documentation or learning materials for this.