
Converting your WordPress site to use HTTPS is easy with Cloudflare. There are two ways of doing it.
- Generate a Cloudflare Origin certificate for 15-years
- Flexible SSL
The first method is more thorough. The second one as shown below, is called “Flexible SSL”, and only encrypts data between Cloudflare and the user’s browser. It’s less secure than the first method, but much easier, and you can get started with HTTPS on WordPress almost immediately without any further configuration.
Both these techniques are free. I suggest using the first one but in a pinch, you can use the second method.
Step 1: Connect with Cloudflare (Free plan)
Many of you already use Cloudflare to speed up your site – no surprise, since Cloudflare is also the best CDN around. Earlier, Cloudflare used to allow web hosts to integrate directly with them, but they recently removed that feature, or made it much more expensive. So you need to integrate with Cloudflare manually by changing your nameservers to Cloudflare.Here’s a tutorial to do just that.
Step 2: Select Flexible SSL on Cloudflare
Once you’ve set up Cloudflare, go to “SSL/TLS” on the sidebar and click “Overview”.
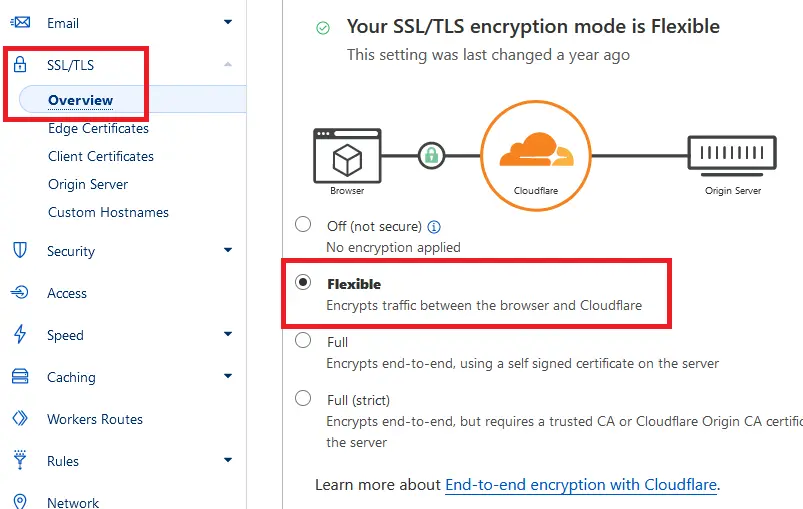
Now choose “Flexible” from the list of options. Your changes should be saved automatically. It might take a short while for them to propagate.
Step 3: Access your Site using HTTPS
Once Cloudflare has enabled Flexible HTTPS on your site, you should already by able to access your WordPress installation using the “https” prefix instead of “http”. The problem is that it doesn’t display properly.

Your stylesheets and third party Javascripts might be missing. If you click on the SSL certificate information from the address bar, you’ll see a lot of error messages about “Mixed Content”. When you check the console, you get more details:
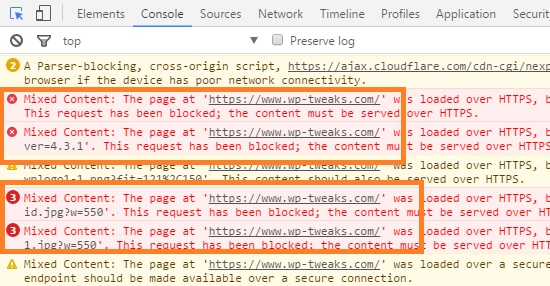
What this means is that even though your main site is loading via HTTPS, a lot of other files on your server are being served via HTTP. Theme files, stylesheets, plugin files etc. This makes sense. The references to these files are still via HTTP – after all, nothing has actually changed on your site.
We’re going to use a simple plugin to solve this problem. And you don’t even have to change your site information in Settings -> General either. In fact, the beauty of the CloudFlare approach is that your existing site remains mostly untouched. This makes it easy to revert back any changes you made.
Step 4: Install the Cloudflare Flexible SSL Plugin
If you’re not facing the problem with mixed content above, then ignore this step. To solve the mixed content problems, install the Cloudflare Flexible SSL add-on to your site. This gem of a plugin does all the dirty work for you. Simply install and activate and you’re done!
Step 5: Redirect all Site Pages to the HTTPS Version
By step 4, your site should be completely HTTPS ready. The only problem is that visitors will still be accessing your basic HTTP site via existing links. And if they type your domain directly into the address bar, they’ll still see the old version. So we need to redirect all requests to HTTPS.
Luckily for us, Cloudflare has a convenient setting that enables all HTTP requests to automatically redirect to HTTPs. To enable this, click “SSL/TLS” as shown below, and choose “Edge Certificates”.
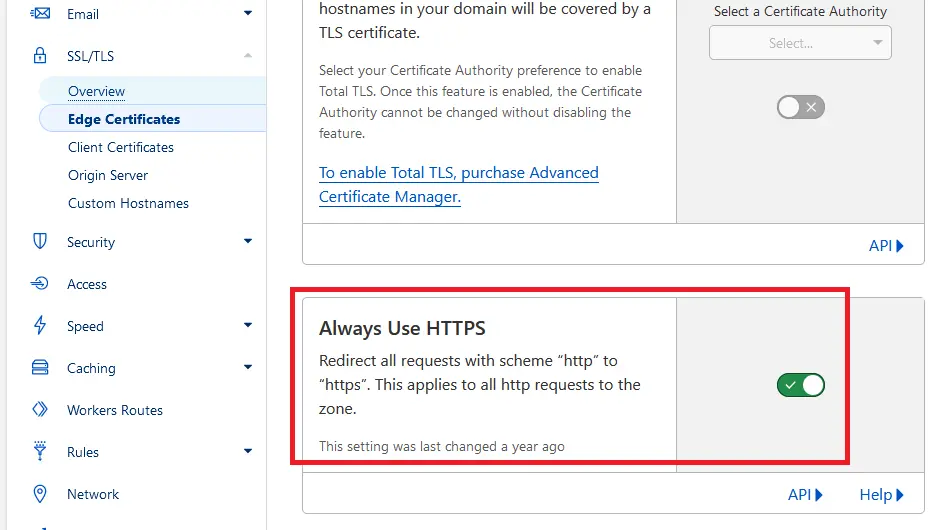
Now enable the toggle slider under “Always Use HTTPS”, and you’re done!
Now all incoming HTTP requests to your site will automatically be redirected to the HTTPS version. If everything goes well, should see a nice pretty lock next to your site URL in the address bar of your browser like this:
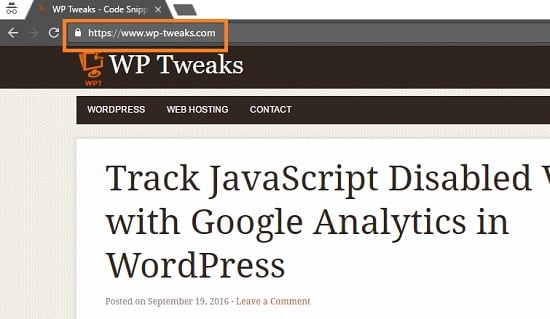
Beautiful isn’t it? With just a few clicks and minimal changes you’ve managed to convert WordPress to HTTPS for free, with a solid SSL certificate. Forever – no expiry date! All using the magic of Cloudflare.
Hi,
Thank you for this article. I did all the steps on my new website and it seems to be working, but I do wonder about one thing.
Some other tutorials also mention to install https://wordpress.org/plugins/wordpress-https/ plugin but I have my doubts I need that. This plugin seems to be doing what CloudFlare Page Rule does and at the moment, my site works fine without it.
What do you think about this plugin? Is it for cases when website doesn’t use CloudFlare?
If your site is working fine right now, I recommend that you don’t mess with anything 🙂 . That plugin also seems to be rather old and hasn’t been updated in a while so we don’t know how well it still works…
Yes the force HTTPs plugins is valuable for SEO cuz sometimes you or client can miss which resource is not secure and forgot to fix it. And CloudFlare didn’t fix some jQuery/AJAX resource: https://wordpress.org/plugins/force-https-littlebizzy/