
One day, I woke up to find that all my Let’s Encrypt SSL certificates had expired. How was this possible? I had been using AutoSSL or Let’s Encrypt for years and they were renewing without any issues. So I went into my web hosting panel and tried to renew them manually, but they all failed. Meanwhile, I was freaking out because my visitors were seeing error messages across all my sites. I frantically contacted my hosting customer support, and they told me that my Let’s Encrypt and AutoSSL SSL certificates couldn’t be renewed because I was using Cloudflare as a proxy.
“This must be a mistake,” I thought. After all, I had been using Cloudflare as a proxy for years, and had never had a problem with AutoSSL or Let’s Encrypt SSL renewal. But here my web hosting support guy was telling me that I need to un-proxy my site from Cloudflare!
After much hair-pulling, I finally settled on a permanent solution that won’t expire in 3 months. Click here to scroll straight to the solution.
Table of Contents
cPanel AutoSSL Renewal Errors Thanks to Cloudflare
I don’t know what changed, but apparently, you now can’t renew Let’s Encrypt or AutoSSL certificates from cPanel if Cloudflare is proxying your site. Here’s a screenshot of the chat transcript I had with my web hosting support:
Now I still think that Cloudflare is the best CDN provider, and it’s done wonders for my site’s TTFB – especially with full site caching. So I’m not going to stop using them. But I don’t blame the support rep. They’re only telling me what they think is the problem. How do I explain to them that my SSL certificates have been renewing for years without any problem? In any case, I was forced to temporarily un-proxy my site from Cloudflare and use it only as a DNS. Then my Let’s Encrypt and AutoSSL certificates were renewed without a problem.
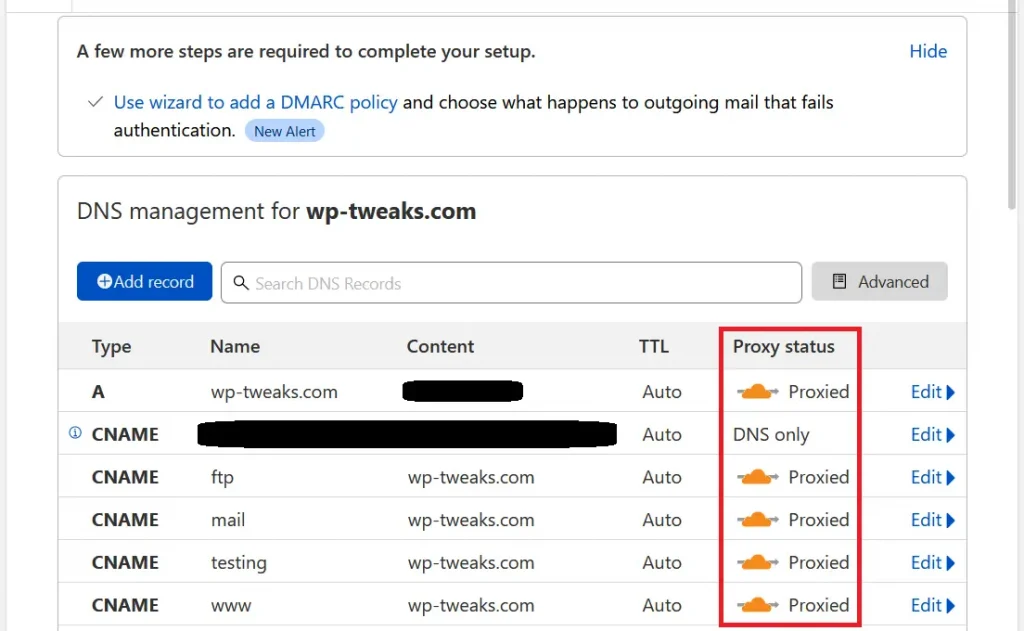
The Problem: Cloudflare Hides your Server’s IP Address
The problem, of course, is that Cloudflare hides your IP address, thanks to the “orange cloud” proxy icon as shown here:
This is great for keeping your site safe, but when you try and renew your Let’s Encrypt SSL certificates, the cPanel tool will check to which IP address your domain resolves. And it’ll only renew it if it resolves to an address on the cPanel server. Under Cloudflare however, the domain name will resolve to a Cloudflare IP address, and so the AutoSSL renewal fails.
There’s no way around this. It’s a fundamentally incompatible situation.
Unsustainable: My Certificates will Expire Again in 3 Months!
The problem is that after 90 days, my AutoSSL certificates will once again fail to renew. If I want to continue using Cloudflare as a proxy, it seems I will have to:
- Set a reminder before they expire
- Remove the proxy functionality from Cloudflare from all my sites
- Renew my Let’s Encrypt certificates
- Turn on Cloudflare proxy again
This is not only too much work, it increases the chances of something going wrong. What if I’m on vacation without access to the Internet when my certificates expire? Google already has a new HTTPS report in the Google Search Console and I don’t want them to inundate me with HTTPS errors.
I needed a more durable solution.
Permanent Fix: Use a Cloudflare Origin Certificate for 15-Years
Unfortunately, there’s no way to continue using AutoSLL or Let’s Encrypt SSL certificates with cPanel under a Cloudflare proxy. Sooner or later, the renewal will fail. And you can’t keep manually stopping the proxy every three months for every site you own. Instead, the best solution is to use a Cloudflare Origin certificate that’s valid for 15-years. This is a permanent solution to the problem. And you can turn on the Full (Strict) encryption mode for your site.
How to Install a Cloudflare Origin Certificate on cPanel
To permanently stop worrying about AutoSSL renewal, here’s how to install a Cloudflare Origin certificate.
Step 1: Create a Certificate on the Cloudflare SSL/TLS Tab
First, go to your Cloudflare dashboard and click the “SSL/TLS” tab. Then click the “Origin Server” sub-tab and hit “Create Certificate” as shown here:
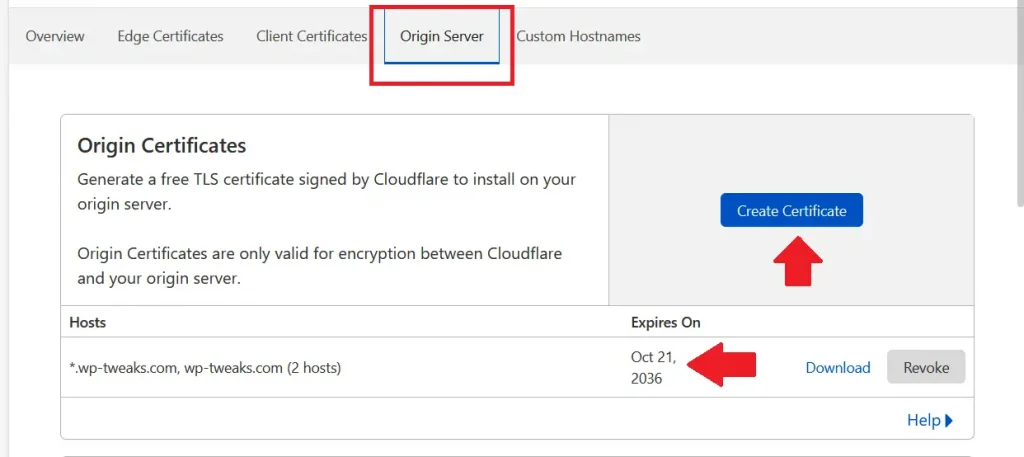
In this screenshot, I’ve already generated an origin certificate. And since today is 2021, this certificate will expire in 2036. You don’t have to renew it till then. Pretty neat! Once you click “Create Certificate”, verify your domain details on the next screen:
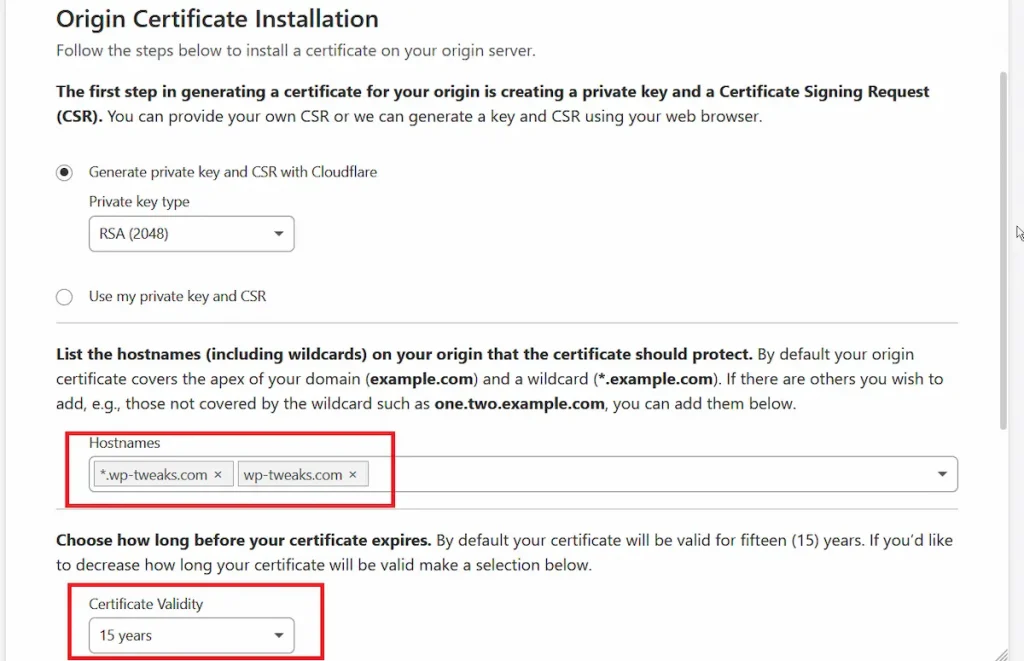
The default settings should be fine in most cases. This SSL certificate covers your root domain, all subdomains, and you can even use wildcards to cover sub-sub-domains if needed. Confirm your details, and generate the certificate on the next screen. You’ll see two boxes with text in them:
- The Cloudflare certificate itself
- The private key
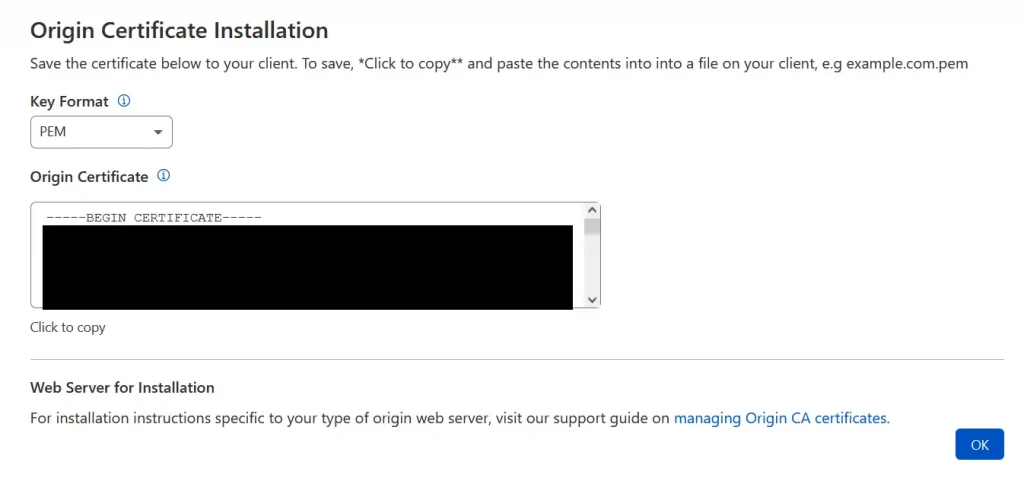
Copy each of these and save them in two separate text files. In particular, save the private key in a place where no one else can access it. This key can be used to decrypt communications between your web host server and Cloudflare. So keep it safe!
Step 2: Install the Cloudflare Origin Certificate in cPanel
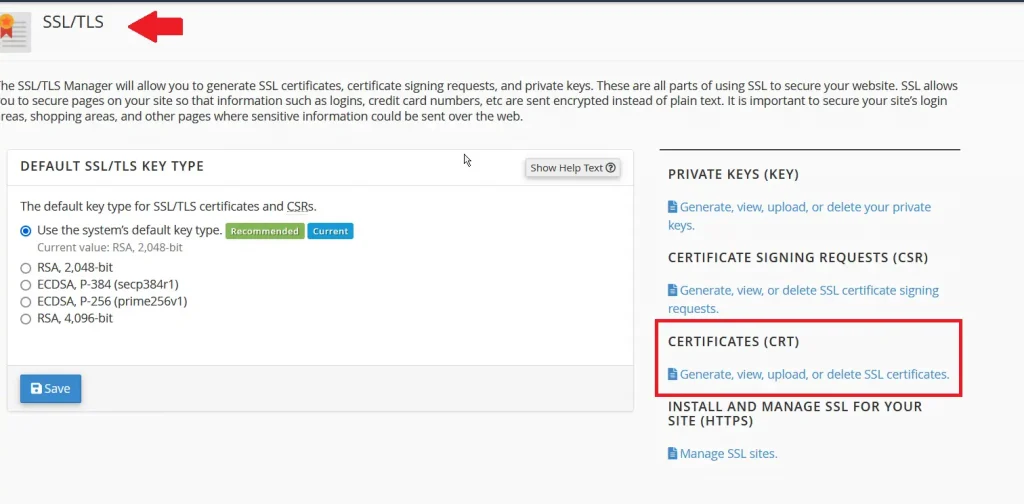
For the next step, log into your cPanel dashboard and go to the “SSL/TLS” section. Now click through to the certificates section where you can generate, view, upload, or delete SSL certificates from your server:
In the certificates screen, scroll down to the section called “Upload a New Certificate”. In the box provided below, paste the code for your certificate (not the private key) into the text area:
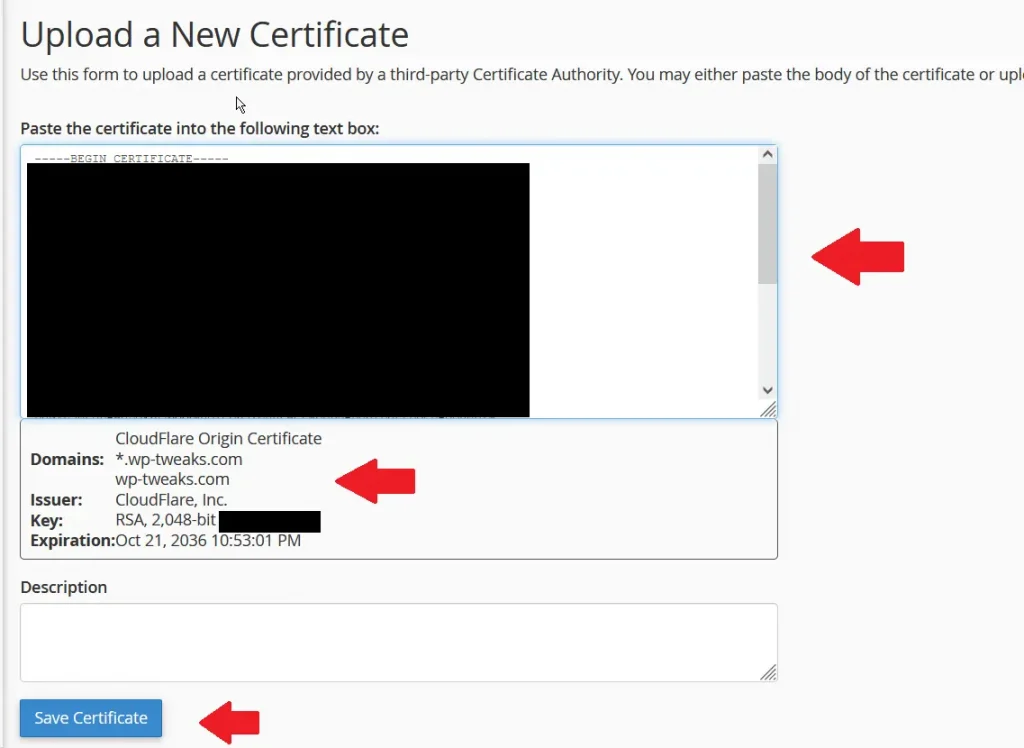
You’ll know you’ve got it right because the bottom will immediately populate with the details of the Cloudflare Origin certificate. Make sure the details are accurate, and then save the certificate. I suggest you also add a brief description of the certificate.
Step 3: Check to See that the Certificate is Added in cPanel
After saving the certificate, scroll up to the top to see if it’s been added to the list. You can see here that my list of SSL certificates now contains the one from Cloudflare that I just uploaded. Now click “Install” like this:
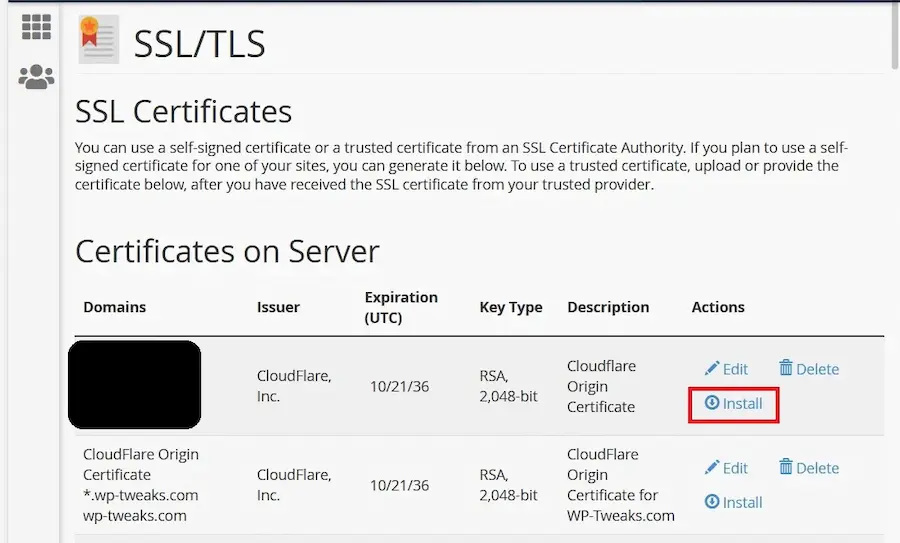
In the following screen, paste the private key that you obtained in step one, then click “Install Certificate”:
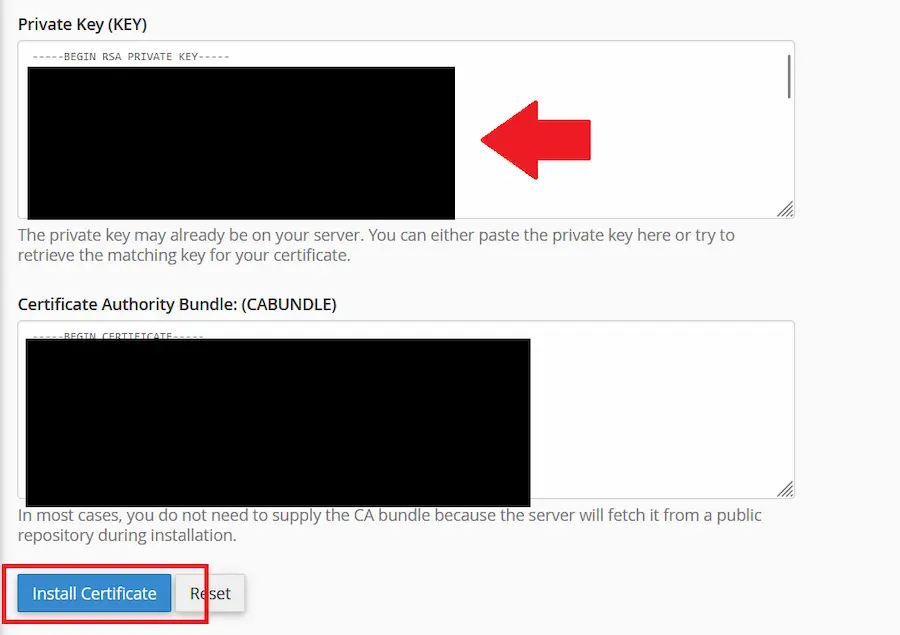
And you’re done! You now don’t need to worry anymore about your AutoSSL certificates expiring because of Cloudflare. Thanks to the origin certificate, you’re set for the next 15 years :).
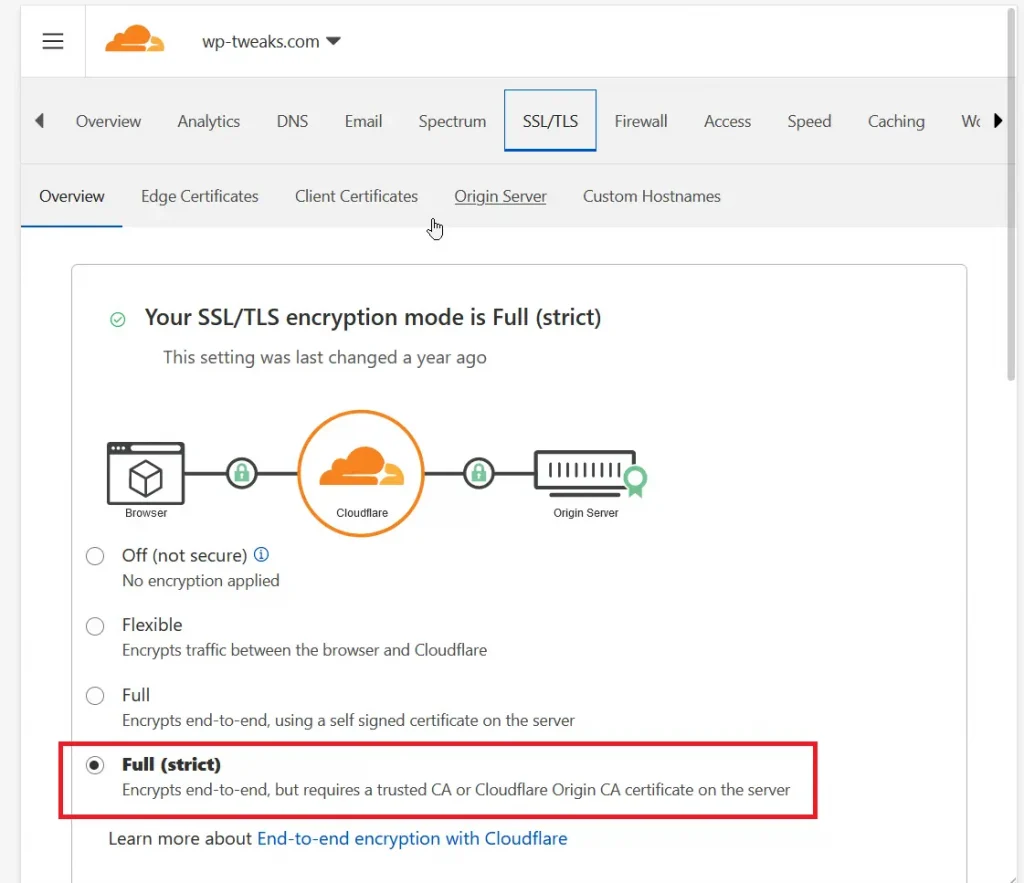
Step 4: Change the Cloudflare Encryption Mode to Full (Strict)
For maximum security, head back to the Cloudflare SSL/TLS section, and enable the last box giving your Full (Strict) security when using Cloudflare:
Congratulations! You now never need to worry about AutoSSL or Let’s Encrypt SSL certificates expiring because you’re behind a Cloudflare proxy.
Enabling AutoSSL When you Use Cloudflare as “DNS Only”
Since the certificate we installed is only valid for encrypting traffic between your web hosting origin server and Cloudflare, you’ll run into problems if you ever disable the Cloudflare proxy and use the “DNS Only” functionality. To get around this, just create the AutoSSL certificates when you’re not using the proxy. It’ll take a couple of minutes and you’ll be set for the next 3-months at least. It’s not ideal, sure. But it’s the best solution I’ve come up with so far.
Hopefully, this tutorial saves you hours of hair-pulling frustration. Web hosts and Cloudflare don’t document this aspect of SSL at all, so this should help!
There are some records that are ‘DNS only’ in Cloudflare, eg for email. How does that work with an Origin certificate only?
Hi Bhagwad,
Request you to please provide a response to the above question. To avoid auto ssl renewal issues, I am planning to use cloudflare origin certificate as explained by you but my concern is that I am using emails also for my domains and have created these email accounts on my cpanel/hpanel. Installing cloudflare origin certificates on cpanel will install ssl on mail servers too but cloudflare origin certificate is meant for web traffic only so how will it affect emails?
Hi Bhagwad,
Thanks for this wonderful article.
However, you haven’t mentioned where to insert the private key in cpanel.
Isn’t the private key also necessary for the ssl to work?
This is the only confusion I am having right now, rest everything looks perfect.
Kindly clarify
Thanks
Hi Swag, sorry for not responding for so long. My e-mail server was down, so I simply stopped getting all e-mail notifications, and didn’t see your comment 🙁
As @Patrick mentions below, I had forgotten to add an additional screenshot in Step 3, showing where to install the certificate in cPanel after uploading it. It’s there that you need to paste in the private key. I’ve updated the tutorial now. I know that by this time you’ve probably already figured out how to do it, but I thought I owed you a response, even if delayed.
Apologies!
Hi, we’ve just hit this issue too. Do you know when cloudflare made this change? I only ask because we have a bunch of other sites set to renew ssl shortly, so we’d like to know when this is likely to occur
@Swag and @Nick,
I’ve just done this myself, and Bhagwad’s missing a piece at Step 3.
In cPanel you need to then install the certificate after you’ve added it, and it’s at the install point that you will need to paste in the Private Key. Once you install the certificate, cPanel will show you a message indicating success, and then you should find you can access your site through cloudflare via HTTPS!
If you haven’t installed the SSL on the cpanel side properly, but have configured it in Cloudflare, Cloudflare may show a connection error indicating the host server does not have the certificate correctly configured.
If you have not installed the SSL on the Server, and also have not configured Cloudflare Origin Certificate either, the scenario you are possibly facing is that when your site goes to load https version of the site, if you’re on shared hosting you will see whatever the first configured https site is on the server instead of your own site.
You’re right, Patrick. I had forgotten to include the additional step, and because my e-mail server was down for a very long time, I didn’t get the notification of the comment. I’ve updated the tutorial and added a couple of additional screenshots.
Thanks for taking the time to reply!
Thank you so much for this post! These instructions were well done and I’ve now got my SSL installed on Cloudflare and cPanel!!
You’re welcome. Glad to help!
this was incredibly valuable, thank you so much!
Great info thank you!
Hi so something changed
Have you tried doing this again , i cant get ti to work im not sure if its Cloudless side or Cpanel but when i create a certificate it still shows the domain Cloudflaire on it
I followed these instructions to create the Cloudflare Origin Certificate and installed it on cPanel. I tested on a website which had AutoSSL already set-up (old way of pausing Cloudflare, running AutoSSL, then re-enabling Cloudflare). The expiration date was September 15, 2023. I ran AutoSSL again and it renewed the certificate with a new expiration date of November 15, 2023.
Many thanks to Bhagwad Park for this useful tutorial. I’ve saved a PDF for my WordPress resources folder!
Hello,
I followed your instructions to the letter and didn’t experience any problems. However, when I view the website cert in the browser, it still shows me the old one from Let’s Encrypt is being used. I also cleared my cache and see the same result.
Thanks!!
Thanks for this ! All installed!
But now I have an email issue with Thunderbird. It can’t fetch emails from that domain anymore. I have to go to webmail to access emails.
I can send emails from Thunderbird but it can’t save a copy in sent folder. How can I fix this?
Thanks!
My SSL/TLS encryption mode is Full (strict) . under this we have “Create a Configuration Rule to customize these settings by hostname.” can we Customize configuration settings let’s encrypt ssl validation requests on this option? right now i used a page rules like this:
on page rules: i have set ssl=off, Security Level=Essentially Off, Cache Level=bypass and url= *.mysite.com/.well-known/acme-challenge/* is everything set right? can you also add some additional info regarding theses options as well?
“Unfortunately, there’s no way to continue using AutoSLL or Let’s Encrypt SSL certificates with cPanel under a Cloudflare proxy. Sooner or later, the renewal will fail. ”
Have you tried the solution which uses a NS Wildcard validation for Let’s Encrypt SSL ?
Works fine (& tested) https://www.whtop.com/blog/auto-renew-issue-lets-encrypt-wildcard-ssl-certificate-cloudflare-external-dns/