
On July 19th, 2018, SiteGround released a new tool that allows you to easily transfer a WordPress site from any other hosting provider to SiteGround. While this was possible previously, it required downloading a copy of your site and databases onto your PC and then uploading that backup.
With this new tool, migrating is far easier and doesn’t require you to download or upload anything manually. Here’s the complete list of SiteGround coupon codes starting at $2.99/month.
Where Can I Use the Migrator?
Many of their tools are available only with GrowBig or GoGeek SiteGround VPS. For example, the SuperCacher, and staging environments. However, the SiteGround WordPress Migrator is available with all hosting plans.
How is This Better than Other Migration Tools?
Other migrations tools do exist. For example, I’m a big fan of the free All-in-One Migration plugin for transferring WordPress sites between hosts. However, the process is complicated and requires you to do the following:
- Install the plugin on the origin WordPress site
- Run the plugin to create a backup
- Download the backup
- Install the plugin on the destination WordPress install
- Upload the backup and restore
Also, keep in mind that the destination WordPress site already needs to exist. You have to ensure that WordPress itself is installed in your preferred location.
While this is actually a pretty seamless process, SiteGround is able to deliver a better experience because they integrate it directly with their services. You don’t manually need to mess around with files, backups, uploads, and downloads. Let’s see how it works!
Step 1: Log into cPanel and Find the WordPress Migration Tool
First, log into cPanel. If you don’t know how here’s a list of cPanel login URLs for each hosting provider. Once you’re in, scroll down to the “WordPress Tools” section and find the icon for the WordPress migrator as shown here:
Once that’s done, we need to select where to install WordPress.
Step 2: Specify the Destination and Generate Token
As mentioned earlier, you don’t need to already have WordPress installed. In fact, you shouldn’t. In the following screen, select the domain name to which you want WordPress transferred.

Optionally, you can also specify a subfolder. So if your domain name is example.com, you can install WordPress in the following folder:
example.com/testwordpressfolder
In which case, you simply use the directory name in the Path field. In this case:
testfolder
Note: The destination folder needs to be empty, otherwise you’ll get the following error:
“there are php files already residing on the selected path”
This error means that you haven’t created an empty folder into which you want to migrate your site, and because of this, SiteGround won’t generate the migration token. So to fix this problem, delete everything in the destination directory. Once done, click the blue button labeled “Generate”. This will now create a unique token linked to your account and destination as shown here:
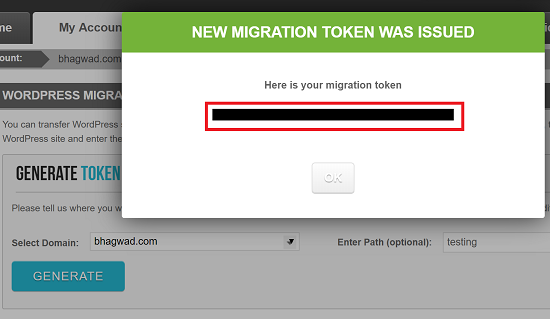
Ensure you copy this string of characters, letters, and dashes exactly as is. In fact, don’t leave this screen. Just keep it as it is in preparation for the next step.
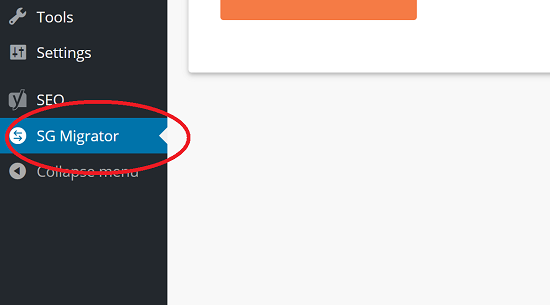
Step 3: Install the SiteGround Migration Plugin on the Origin Site
Now go to the existing WordPress site you want to transfer and install the SiteGround WordPress migration plugin. Once you download and activate it, you’ll see a new item at the bottom left of your WordPress dashboard as shown here:
Clicking this will bring you to a screen where you can now paste the migration token you got earlier like this:
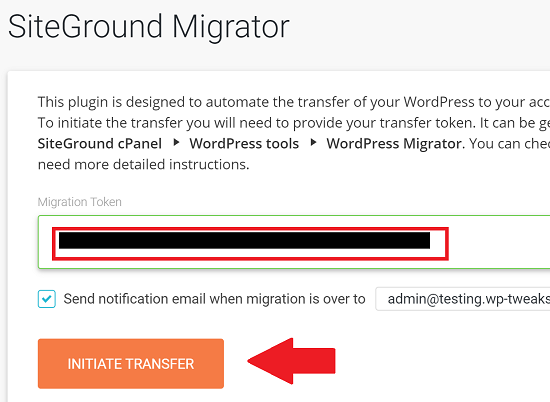
Optionally, you can also select to have an e-mail sent to the WordPress admin when the transfer is complete. Now click the big orange button labeled “Initiate Transfer” as shown above.
And you’re done! SiteGround will now automatically transfer your entire WordPress site to the destination domain and folder you specified earlier.
Basically, this is the easiest way to migrate your WordPress site as long as you’re hosting with SiteGround! They have other WordPress tools like the super cacher, staging for testing changes, and other benefits. For these reasons, it should be near the top of your list when choosing where to host your WordPress site!
Speak Your Mind