
SSH is a valuable tool to quickly run commands on your HostGator server without logging into cPanel. Here’s how to enable and access the HostGator SSH service.
Table of Contents
Prerequisites to Access HostGator SSH
Before you connect to HostGator SSH, you need to have the following in place:
Get Your HostGator SSH Login Information
To login to HostGator via SSH, you need four pieces of information:
- Your IP address
- The SSH port number
- Your cPanel username
- Your cPanel password (Not required if you’re using SSH key authentication)
Here’s how to get each of them.
HostGator Username and IP Address
Luckily, we can find the username and the IP address in the same location we enabled SSH access. Just consult the first screenshot to get these details.
HostGator SSH Port Number
The port number for HostGator SSH access is different for shared hosting and VPS/Dedicated servers:
- HostGator shared reseller hosting port number: 2222
- HostGator VPS and dedicated hosting port number: 22
HostGator cPanel Password
This is tricky. Your HostGator cPanel password is not the same as your HostGator login password. You can access your HostGator cPanel password by clicking the “Reset” button in the settings screen as shown here:
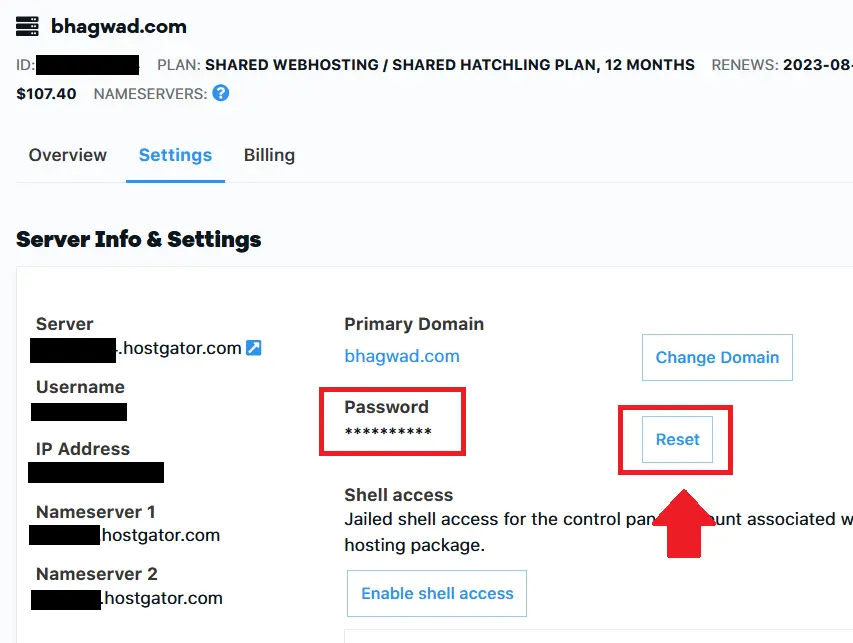
The HostGator documentation states that you receive this password in an e-mail when they activate your account. But this information was missing in my activation e-mail. So if you don’t know your HostGator password, just reset it in the setting screen as above and save it in a safe location.
Note: If you enter your HostGator account password while connecting to SSH, you’ll get a message saying, “HostGator SSH permission denied”. So ensure you use your cPanel password, not the HostGator dashboard password.
An SSH Client: PuTTy
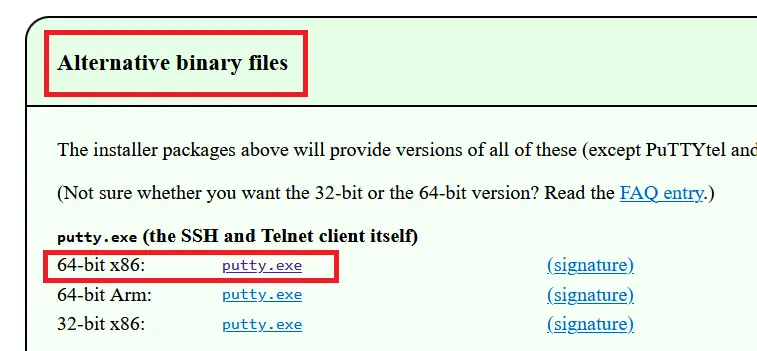
To connect to SSH, you need an SSH client. And there’s none better than PuTTy. Head over to https://putty.org/, and click “Download PuTTy” as shown here:

In the next screen, choose the version of PuTTy that suits your operating system. Most of us will choose the Windows 64-bit version, as shown here:
This will download a simple executable file that doesn’t require any installation. Save it to a folder from where you can easily access it. To run PuTTy, double-click this file.
Method 1: Username and Password SSH Authentication
Here’s how to log in to HostGator SSH using your cPanel username and password.
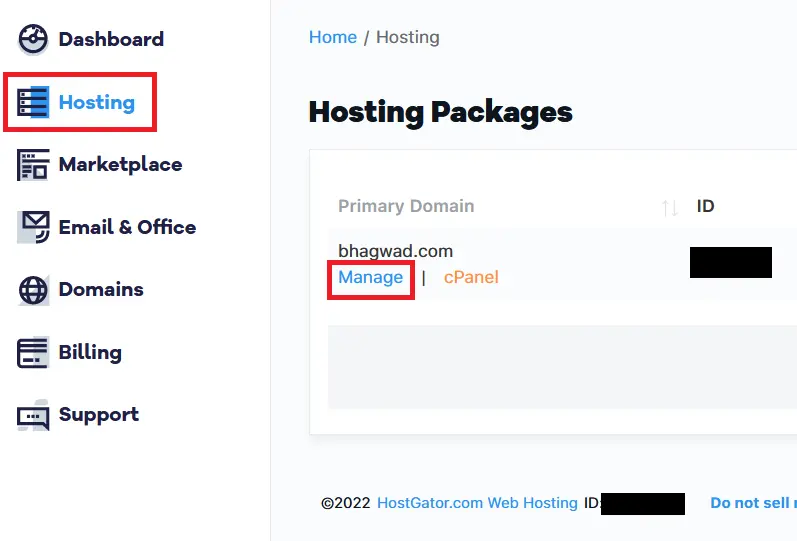
Step 1: Enable HostGator SSH in the Dashboard
By default, HostGator SSH is disabled, but enabling it is easy. If the HostGator provisioning process is complete, click the “Hosting” link on the right-hand side, and then click “Manage” next to the account for which you want to enable SSH:
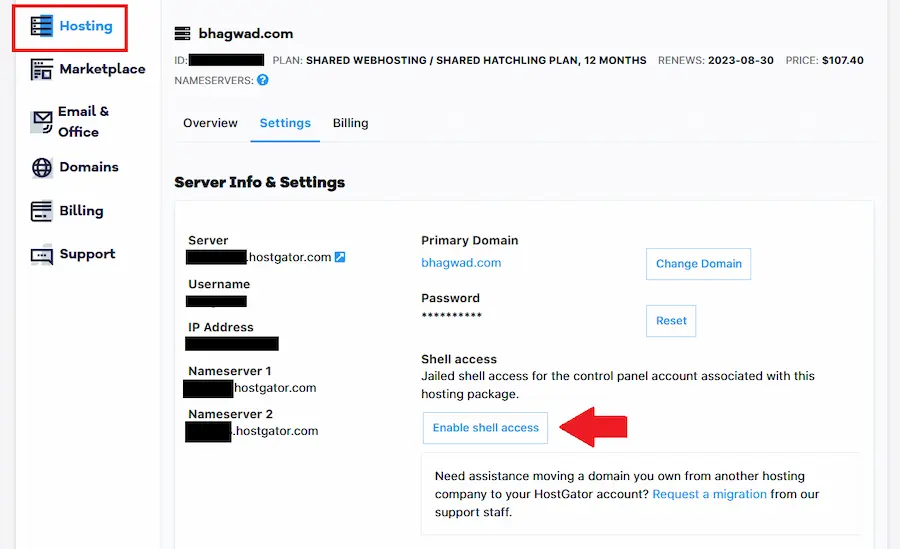
On the next screen, click “Settings,” and it will show you all the information you need to access your account. On the bottom, you’ll see a button that allows you to enable SSH on HostGator, as shown here:
After a few seconds, you’ll get a message indicating that shell access is now enabled for your HostGator account:
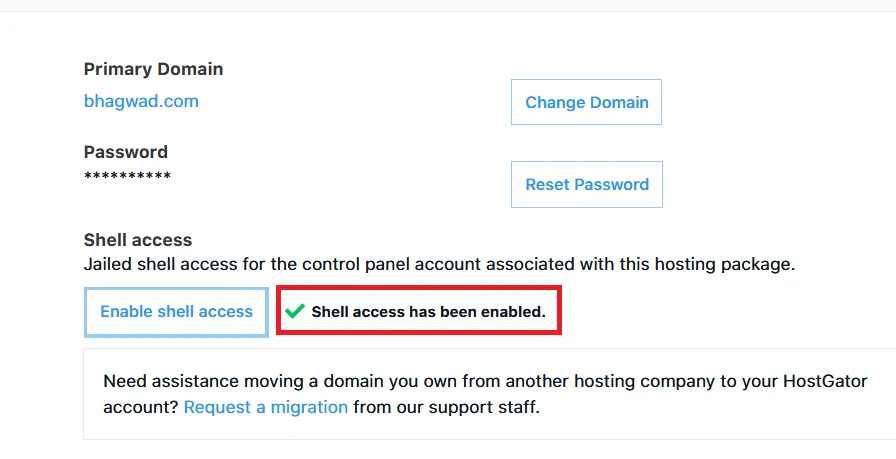
Once you see this message, it means that SSH is now available for your account:
Step 2: Connect to HostGator via SSH
We’re finally ready to access HostGator via SSH. Open PuTTy – the file you downloaded earlier – and input the IP address and port number in the areas shown here:
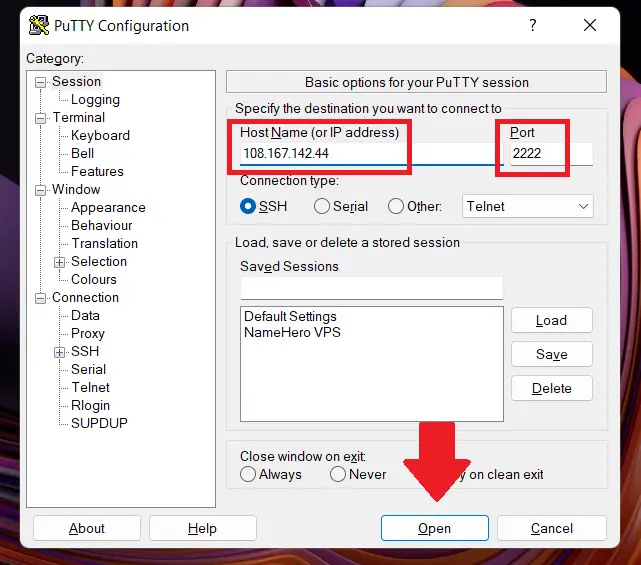
Once you’ve inputted these details, click “Open,” as shown above. But you can also save these details as a separate profile in PuTTy so that you won’t have to type this in each time you connect.
This will open an SSH terminal to your HostGator server, where you need to type in your username and password:
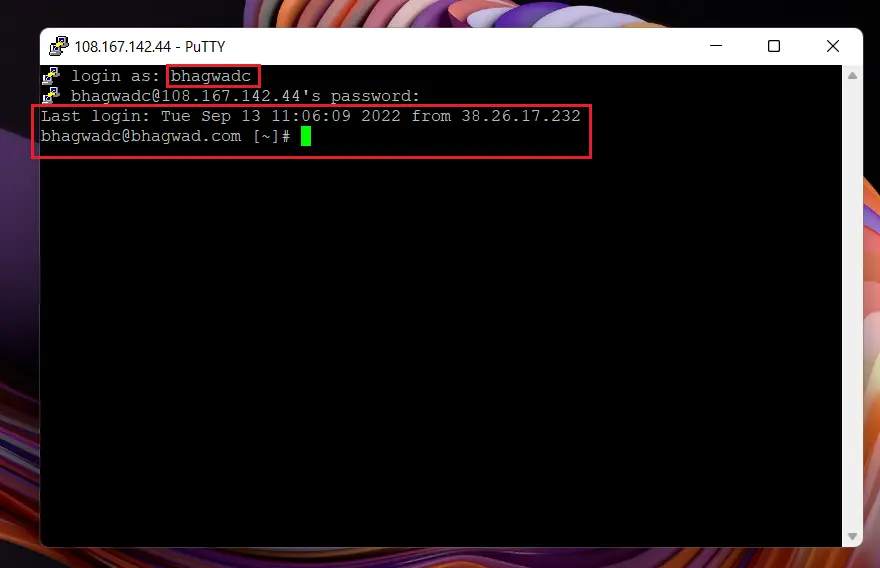
Type in your username, press “Enter,” and then type in your password. Note that your password won’t be visible as you type it into PuTTy. You won’t see the cursor move, either. This is a security measure so that others watching you won’t even know how many characters you might have typed in. If your password is too long, copy it to the clipboard, and then when PuTTy asks you to type in your password, right-click. You won’t see anything because the cursor won’t move, but the SSH client will accept it in the background. After right-clicking, just hit “Enter.”
If you’ve done everything correctly, the system will log you into the HostGator SSH, as shown above.
Method 2: Using HostGator SSH Keys for Authorization
Though authentication via username and password is simple, it has two significant drawbacks:
- You need to input your username and password each time you want to connect
- Someone can hack or steal your HostGator cPanel password
To overcome these disadvantages, you can use Hostgator SSH keys for authentication. Here’s how.
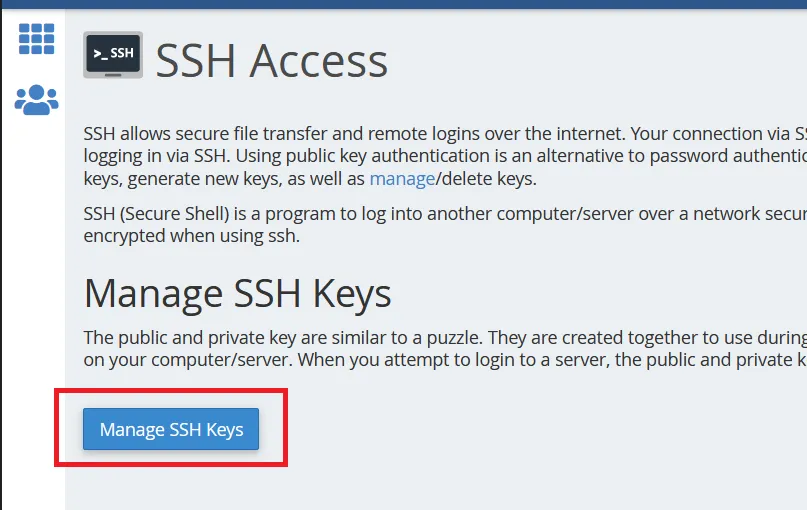
Step 1: Access SSH from the HostGator cPanel
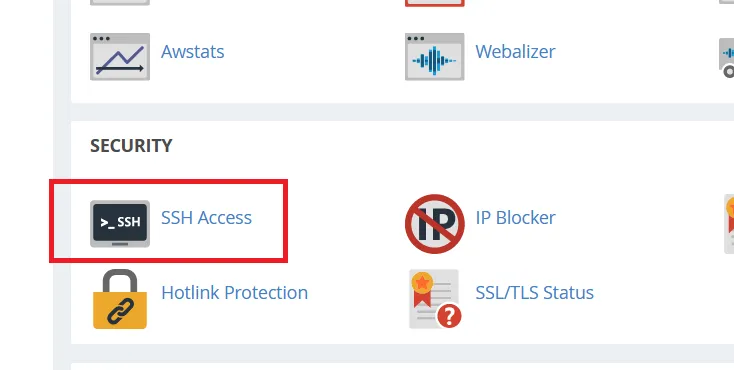
To generate SSH keys, you need to login to HostGator cPanel using one of the methods in the link. Once inside, scroll down to the “Security” section till you see the SSH icon as shown here:
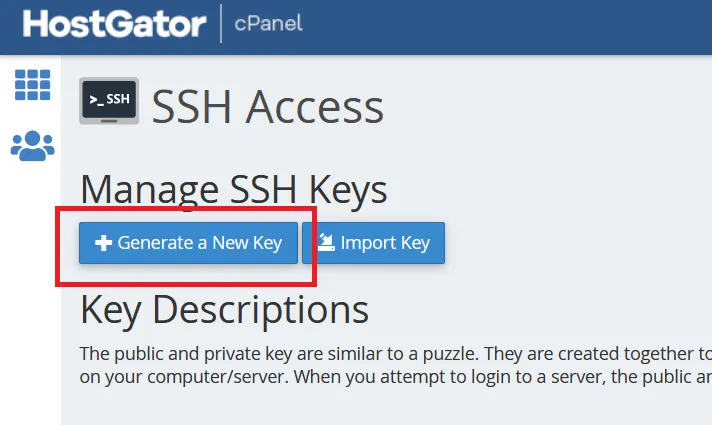
Step 2: Generate a New HostGator SSH Key Pair
On the next screen, click the button to “Manage SSH Keys”:
Now click “Generate a New Key,” as shown here:
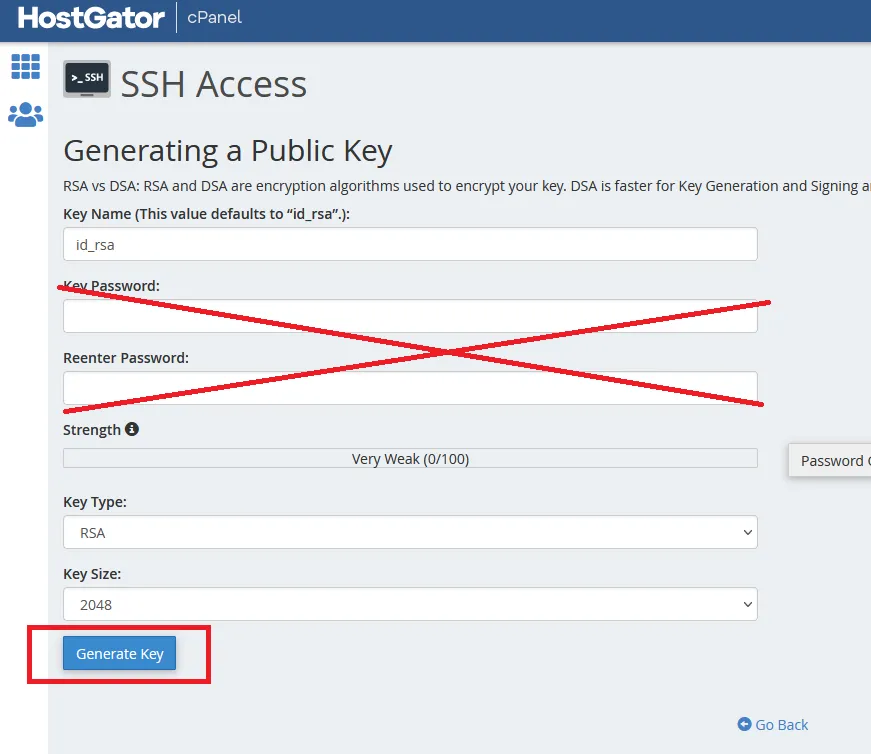
I recommend you leave everything as it is on the following screen and click “Generate Key”. Note: Do NOT enter a password! If you do, you’ll have to enter this password every time you log into SSH with this key, which defeats one of the benefits of using SSH key authentication in the first place.
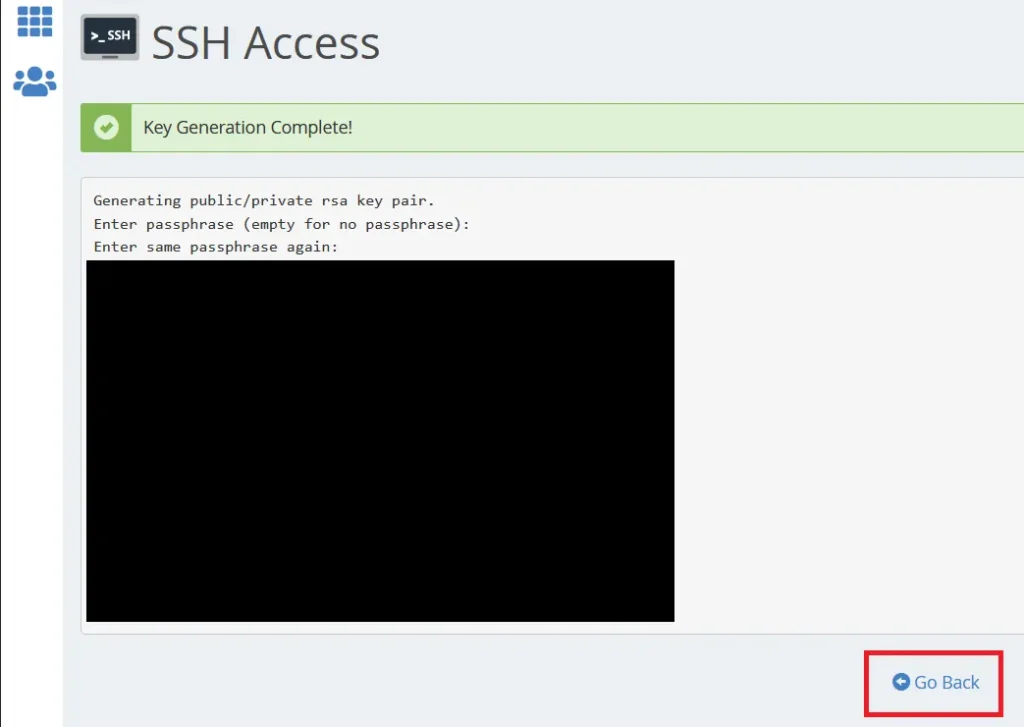
The system will run the commands to generate a new key and show you the completion screen like this. Once done, click the “Go Back” button.
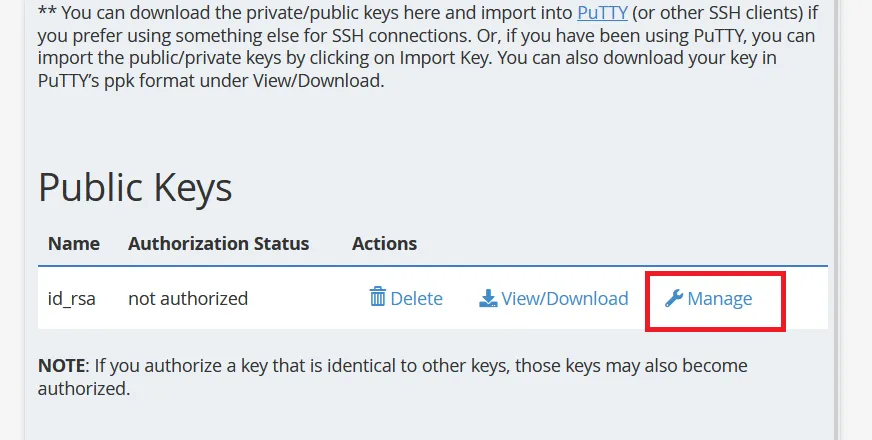
Step 3: Authorize the Public Key
Before we can use the key we just created, we need to authorize it first. Authorizing and deauthorizing keys allow you to quickly disable access for someone to whom you’ve given the key. To authorize our key, click “Manage” in the list of keys as shown here:
On the next screen, click “Authorize”:
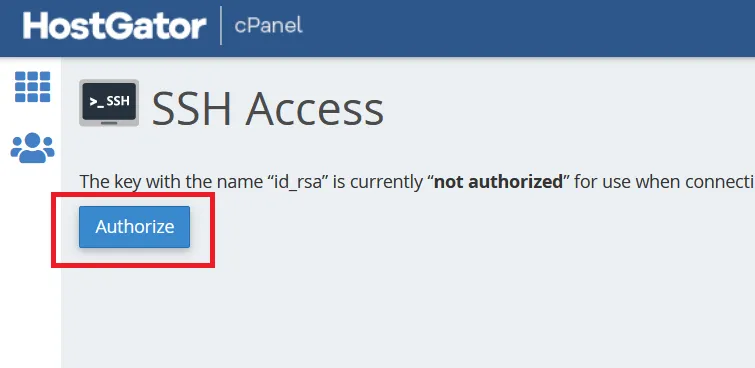
Once your key is authorized, you’re ready to download the private key.
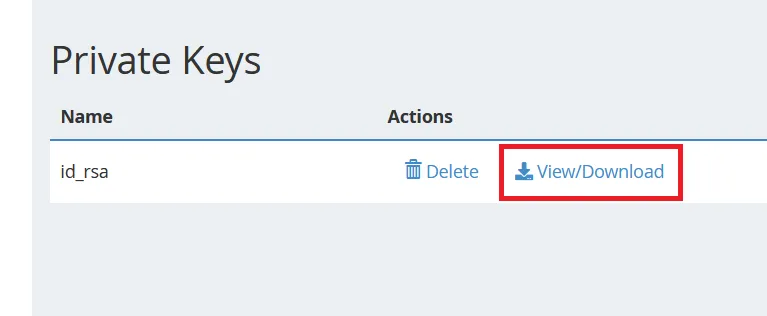
Step 3: Download the Private SSH Key
Corresponding to the public SSH key we just created is a private key that only should possess as a file on your computer. To download it, scroll down to “Private Keys” and click “View/Download”:
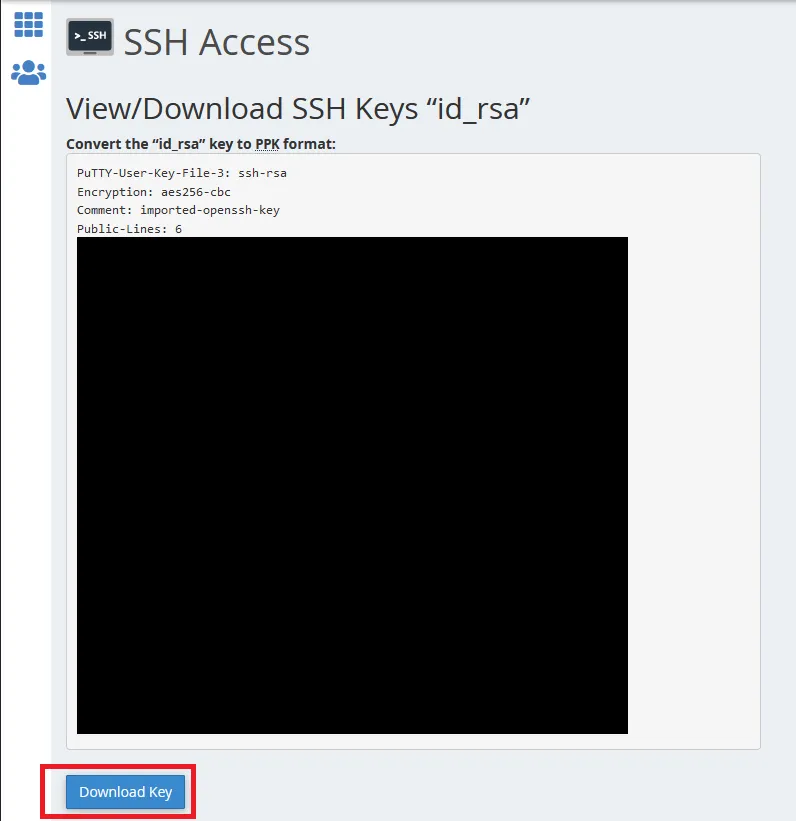
But before we download the private key, we need to convert it into a usable format. To do this, scroll down to the section that says “Convert the id_rsa key to PPK format” and click “Convert”. Since we didn’t generate the key with a passphrase, you can leave the passphrase field blank:
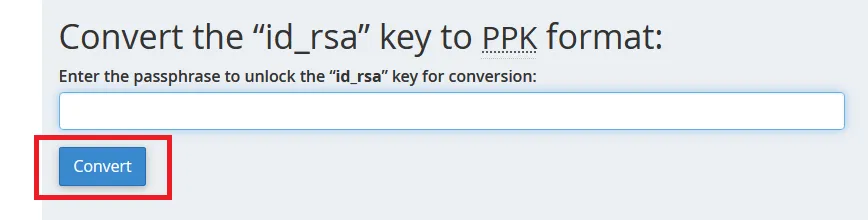
The tool will convert the private key into a special format. Click “Download Key”.
This will download the private key to your local computer as a file. Save it in a location that you remember. Without this file, you won’t be able to use SSH authentication to log into HostGator SSH.
Step 4: Configure PuTTy to use the Private SSH Key File
Open PuTTy – the SSH client you downloaded in the prerequisites, and enter your HostGator IP address and port number that you gathered in the previous step on SSH login details. But DON’T click “Open” yet.
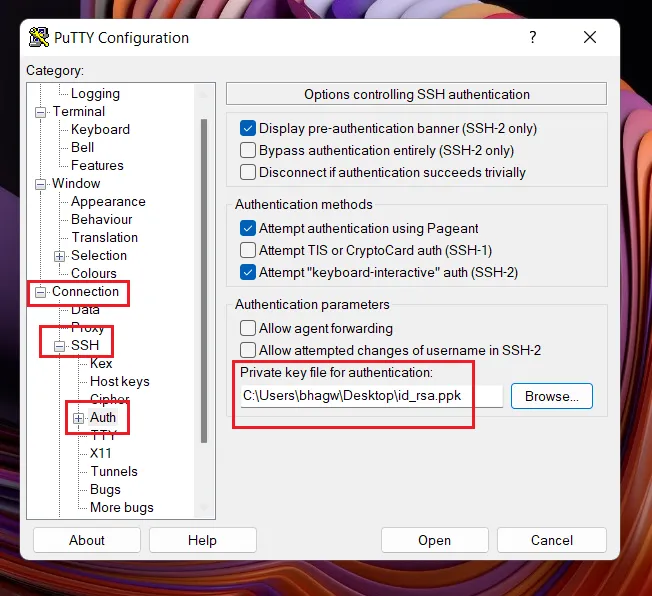
But instead of clicking “Open”, there’s an additional step. On the left-hand panel, click “Connection -> SSH -> Auth” as shown here. Then click “Browse” and select the private key file you downloaded in Step 3.
Now, I suggest you save your profile information so that you don’t have to do this each time you connect in the future. Go back to the “Session”, enter a new profile name, and click save. In the future, you can connect using SSH keys simply by double-clicking your profile name in PuTTy.
When you click “Open”, PuTTy will ask you for your username, which you type in and click “Enter”. If you’ve done everything correctly so far, it will use your private key to log into the HostGator SSH terminal as shown here:
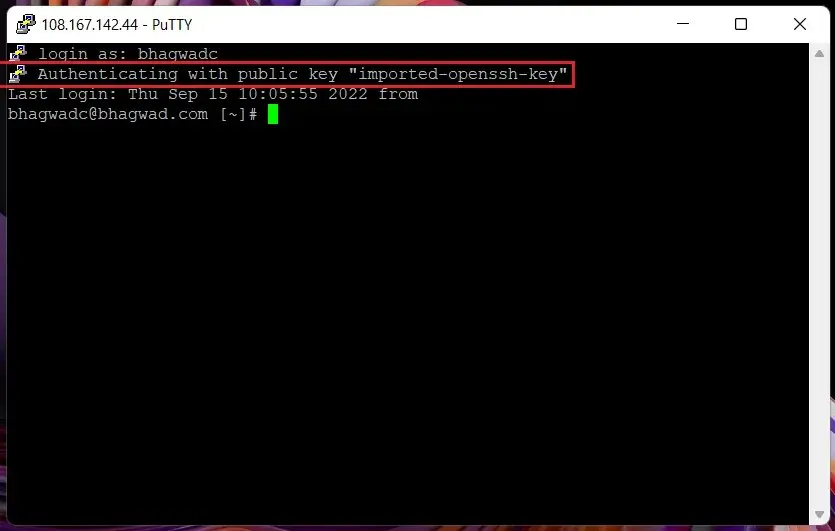
And you’re in!
Final Thoughts
This SSH tutorial will work for any web host using cPanel, not HostGator. This process is similar to accessing your site with SFTP, which is more secure than FTP. I hope you found this a helpful guide!
Speak Your Mind