
Thanks to Cache Rules, we can easily configure Cloudflare to serve stale content while updating resources from the server. This bypasses the speed penalty of serving outdated content by dipping into the Cloudflare cache one last time for static assets that most likely haven’t changed yet.
Table of Contents
1. Create a Cache Rule to Enable Cloudflare to Serve Stale Content
Log into your Cloudflare dashboard, and under “Cache”, select “Cache Rules” as shown here:

If you’re using the Cloudflare free-tier, you have a limit of 10 cache rules. For Pro users like me, the limit is 25. Click “Create cache rule” as shown here:

Now we’ll configure our rule.
2. Decide Which URLs are Eligible for Serving Stale Content
Let’s say you want Cloudflare to serve stale content only for PNG and JPG images. You can do this by specifying that the URLs should end with either PNG or JPG, as shown here:
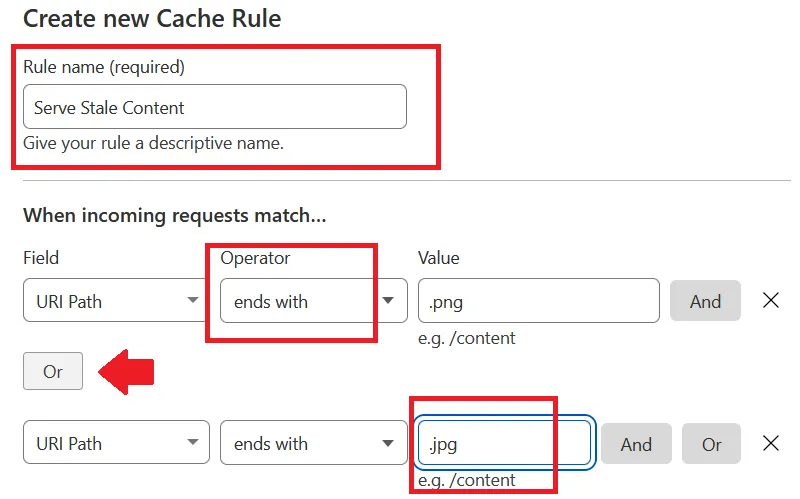
To this, you can add as many additional lines as you want. You can create one line for JavaScript JS files and one for files ending in CSS. If you’re using the Super Page Cache for Cloudflare WordPress add-on for full WordPress caching, you can even specify your regular HTML pages if they end with a slash (/).
If you’re familiar with Cloudflare’s expression editor, you can use it to create even more complicated rules. For example, here’s the expression that will match all images files with the PNG extension:
any(http.request.headers["content-type"][*] == "image/png")
3. Enable Stale Content
Finally, scroll down to the options, find the one labeled “Serve stale content” as shown here, and click “Add”:

This action will expand the section. Make sure that you DON’T enable the button. It’s unintuitive, but if you enable the toggle to green, Cloudflare will disable serving stale content for the URLs you’ve defined in step 2.
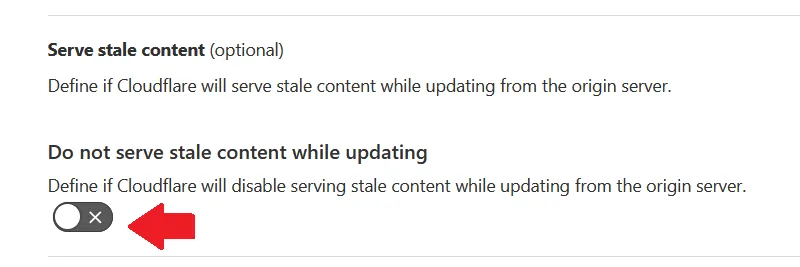
So just click “Add” and nothing more.
Scroll to the bottom of the page and if you’re confident that you’ve done everything correctly, click “Deploy”. That’s it!
Benefits of Serving Stale Content with Cloudflare
The word “stale” sounds terrible, but it isn’t. Every file that Cloudflare caches, has an expiry date. This doesn’t mean anything has changed, particularly for static assets like images, CSS and JavaScript. The expiry date simply defines when Cloudflare will reach back to the origin server to fetch the latest version of the file.
Unfortunately, Cloudflare only checks if the file is expired when a user actually requests it. Expired content isn’t refreshed proactively. So if a visitor requests an image and Cloudflare notices it’s past the expiry date, it will make the visitor wait and fetch that resource from your origin server. This takes time.
Enabling stale content lets Cloudflare serve the visitor an old copy of the resource one last time. Since this copy is already in the Cloudflare cache, it reaches the visitor as fast as any other Cloudflare resource. And in the background, Cloudflare refreshes the file from the origin, ready to serve the next visitor. So serving stale content for static files is a great trade-off and almost always worth it.
Doesn’t Apply to Files that Cloudflare Drops Automatically
Despite what they might have you believe, CDNs regularly ignore your cache-retention policies and drop files from their storage if no one has requested them for a couple of days. If Cloudflare has purged your file like this, then the stale directive doesn’t apply, and it will reach back to your origin server to get a new copy of the file because it no longer has the older one in the cache.
Thanks to the new Cloudflare Cache Reserve service, the good news is that you can ensure that your files are never lost due to inactivity. There are still some kinks to work out, and it’s not free, but I can foresee this as the future of EDGE caching. With cache reserve enabled and Cloudflare serving stale content, you free up your origin server’s resources and allow it to focus on dynamic content, making everything faster.
Thanks for this guide! Is choosing the Edge TTL or Browser TTL settings required? If yes, what would be ideal settings for them? Also what do you think of choosing URI path contains /wp-content/uploads/ for the rule?
in configuration rules when there is a button like: enable the toggle to green option. example on your screenshot. does green mean yes or no? let’s day i wants to turn of Automatic HTTPS Rewrites (optional) should i just press + and keep the toggle green or keep it grey x symbol?