
Instead of just caching static assets like images, CSS, and JavaScript files, you can use Cloudflare to cache your entire WordPress site. So if you have mainly static content that doesn’t change very often, you can get Cloudflare to host your website! When combined with Cloudflare Cache Reserve, Cloudflare can serve as a second hosting provider, masking your underlying web host for blazing fast speeds. Here’s how to do it.
Table of Contents
Step 1: Download the Super Page Cache for Cloudflare Plugin
While it’s possible to configure Cloudflare to cache your WordPress website manually, it’s much easier to use a plugin to cover all the edge-case scenarios and configure it so that you can use the non-cached version of your site if you wish. And the best plugin for that is Super Page Cache for Cloudflare – earlier known as WP Cloudflare Page Cache.
Download this plugin, and go to the configuration screen under “Settings -> Super Page Cache for Cloudflare”.
Step 2: Obtain Your Cloudflare Global API Key
The plugin needs the Global API key to automatically manage the interface between your site and Cloudflare. To obtain this, log into your Cloudflare dashboard, click the profile icon on the top-right, and click “My Profile” as shown here:

Now click “API Tokens” on the right-hand side, then find “Global API Key” and click “View”:
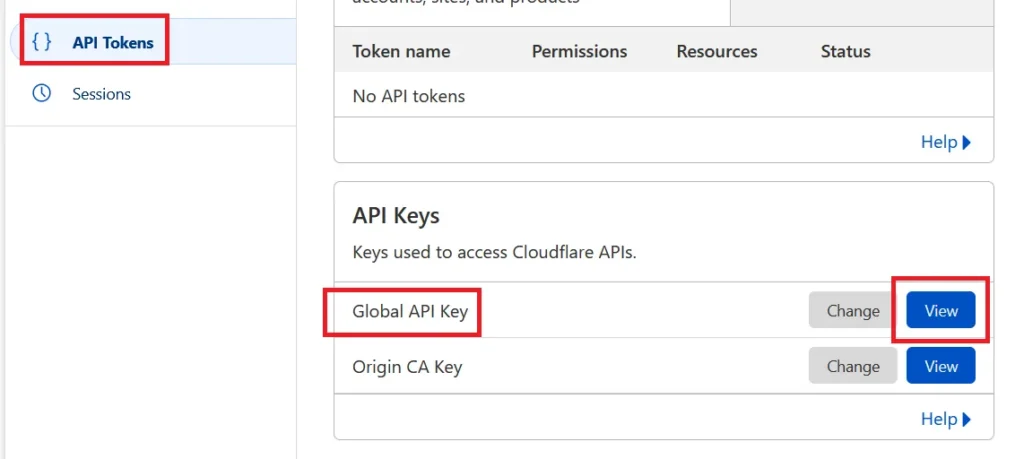
The next screen will ask you to confirm your Cloudflare password and pass a Turnstile test. Once that’s done, Cloudflare will show you the Global API key. Warning: This key is very sensitive. Don’t show it to random people.

Once you’ve copied this key, go back to the Super Page Cache for Cloudflare settings page. For “Authentication mode”, click “API Key”, choose your Cloudflare e-mail ID and then paste the above Global API Key into the box provided as shown here:

Scroll down, select the domain name for which you want to enable Cloudflare caching for WordPress, and save your changes.
Step 3: Enable Caching and Test that It’s Working
Once you’ve finished the configuration and saved your settings, you can enable and disable the Cloudflare cache for WordPress by toggling the orange buttons at the top of the settings screen like this:

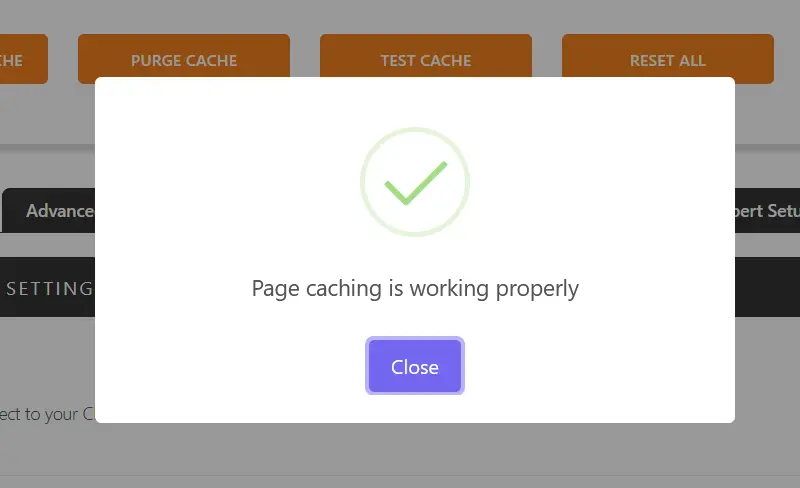
You can also click the “Test Cache” button and verify that everything is working as it should:
And you’re set!
Step 4: Configure the Default Settings for Cloudflare WordPress Cache
The default settings for the Super Page Cache for Cloudflare plugin are pretty good. But you can click the “Cache” tab for further configuration and fine-tune the experience. For example, when purging updated pages, I choose to purge HTML pages only – no need to reset the cache for all static files when you’ve just made changes to a post.
You can also configure Fallback Page Caching, which saves copies of your pages on your server. This is similar to regular WordPress caching plugins like W3 Total Cache. Other advanced options include preloading purged pages that you can configure to your taste.
Test that Cloudflare WordPress Page Cache is Working
To test that Cloudflare is caching your WordPress pages, first, load a page in the browser to “prime” the cache. Then open your browser’s development tools by pressing “Ctrl + Shift + C” and choose the “Network” tab. When you refresh your page, it should show you all the resources the browser has loaded. The first one will be your page URL. Select it, and on the right-hand side, check the “Response Headers” as shown here:
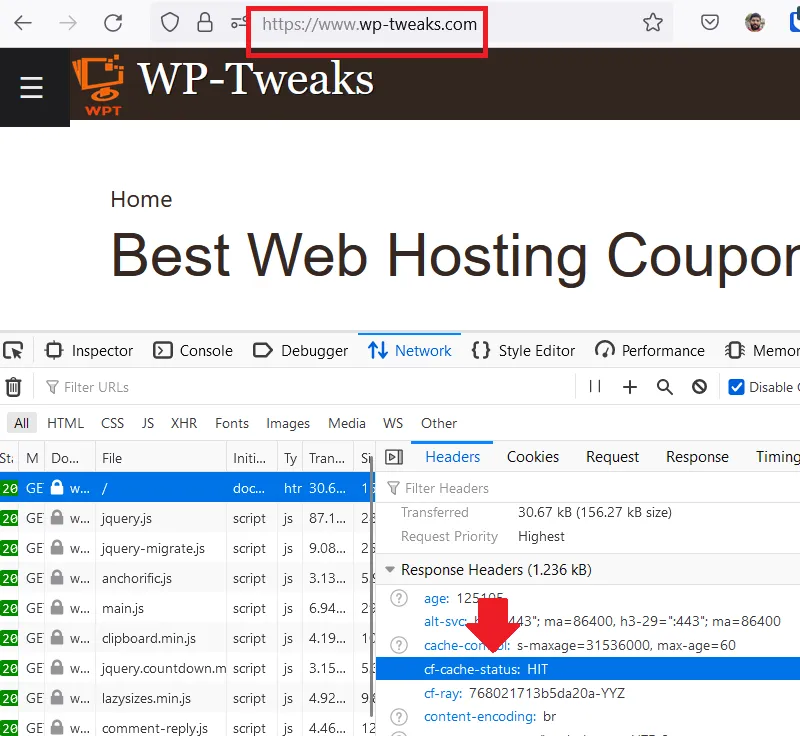
There should be a new response header called “cf-cache-status” and the value should be “HIT” as seen above. It means that Cloudflare is serving this page from its cache.
Blazing Fast Response Times for the Cloudflare WordPress Cache
To test the response times, I use Cloudflare Analytics, which is better than Google Analytics for measuring page speeds. You can see that I have an average response time of just 15ms because most of my WordPress pages are served from Cloudflare:
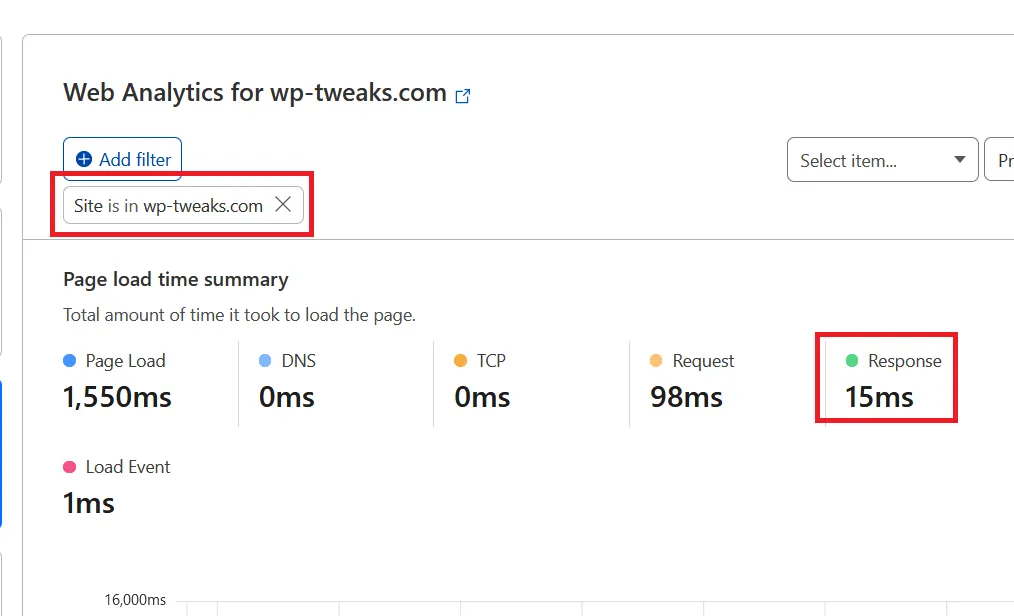
That’s faster than any web hosting and any regular caching plugin. For additional speed, you can even configure Cloudflare to serve stale content from the cache while it pulls the fresh asset from the origin server.
Accessing Non-Cached Versions of Your Page
Of course, you’ll often want to view the non-cached version of your page. To do this, append the query string “?swcfpc=1” to your URL, and it will bypass Cloudflare’s cache. For example, if you want to see the non-cached version of this URL:
https://www.example.com
Change it to:
https://www.example.com/?swcfpc=1
Not only will this load the “real” page, but it’ll also change all the links on the page to include the query parameter so that you can browse the non-cached version of your website without needing to add the query each time. It works great!
Option to Use Cloudflare Workers for WordPress Caching
In the settings for Super Page Cache for Cloudflare, you can enable Cloudflare workers to carry out the caching for WordPress. It’s an alternative method for achieving the same thing, but I think it brings very few additional benefits. In addition, Workers aren’t entirely free – there’s a generous free tier, but once you cross that, you get billed for usage.
I suggest you use Workers for Cloudflare caching only if the default settings aren’t working. Super Page Cache for Cloudflare automatically modifies the cache-control headers so you don’t have to.
Why I Don’t Use Cloudflare’s “APO” for WordPress Caching
Did you know that Cloudflare has its own solution for WordPress caching? It’s called “APO” – Automatic Platform Optimization for WordPress. Here’s where you can enable it in the Cloudflare dashboard:

But there are two big reasons why I don’t use it.
First, it’s inferior to the Super Page Cache for Cloudflare plugin doesn’t provide nearly enough flexibility, and doesn’t play well with cookies. The creators of this plugin don’t use WordPress regularly, and they’re pretty unresponsive to feedback.
By contrast, the creator of the Super Page Cache for Cloudflare plugin is freely accessible on Twitter and very responsive.
Saumya is a big Cloudflare fan and worth following for that reason alone!
The second problem with the Cloudflare APO platform is that it’s for paid users only. This doesn’t impact me since I have a Pro Cloudflare subscription, but most people don’t. And why would you choose to use an inferior product when there’s a better one available for free?
Integration with Cloudflare Cache Reserve
With the introduction of Cloudflare Cache Reserve, full-page caching on Cloudflare is even more attractive. Previously, Cloudflare used to ignore your cache retention policies if no one accessed your asset for two days. But it wasn’t just Cloudflare that did this – every CDN had similar restrictions. This was terrible for “long-tail” content on your site.
But with Cloudflare Cache Reserve, your content stays on Cloudflare’s R2 storage indefinitely. It’s not a free service, but the quota limits are so high that it’s virtually free for small and medium-sized websites. Combined with the Super Page Cache for Cloudflare plugin, your entire WordPress site can now live permanently on Cloudflare and act as a second web host!
Cloudflare Can Mask Cheap Web Hosting
With Super Page Cache for Cloudflare and Cache Reserve, you can get away with cheap web hosting if your website doesn’t have too much dynamic content. For example, you can purchase a web hosting plan for just $2.57/m using a HostGator coupon code, but with Cloudflare Cache Reserve and WordPress caching, your site can load just as fast as expensive hosting.
If this becomes more popular, expect a mass migration from expensive to cheap hosting.
QUIC.cloud Also Has WordPress Caching
In addition to Cloudflare, QUIC.cloud lets you cache WordPress pages using the LiteSpeed caching plugin. It works nicely but doesn’t have as much flexibility as Cloudflare in terms of API and page rules. Cloudflare is a far more mature product, but QUIC.cloud can catch up if they play their cards right. Check out my QUIC.cloud vs Cloudflare comparison for more details.
Final Thoughts
I’ve been using Cloudflare WordPress caching for years, thanks to Saumya’s great plugin. With Cache Reserve, this trend will only increase. It’s terrible news for premium hosting providers, but it’s a great way to democratize page speed across the globe.
BHAGWAD
Thanks for the article!
I just switched from Litespeed Cache to Super Page Cache for Cloudflare and activated Tiered Cache and Cache Reserve on Cloudflare. Now, I have the best numbers I have ever had on PageSpeed Insights.
But I appear to have a problem: In my response header, I get “cf-cache-status: BYPASS.”
What does this mean and, if it’s not good, how do I change it to “HIT”?
NEAL
Thank you for the article. Do you my chance have a deep dive on how to set up the plug-in to have the best performance for a dynamic page?
Thanks for the useful articles.
Recently I found that Cloudflare moved Ignore Query String function (under Cache Key of Cache Rules) from Free to Enterprise plan, would like to know your suggestion for it.
Is it still required or we can just use the Cache Reserve for small and medium size websites?
thanks to explain plugin settings