
Hostgator has three CDN options. With servers in Texas and Utah in the United States, a CDN helps spread the content globally. The free in-built CDN via the Cloudflare network is available with all plans. I’ve written before about how Cloudflare is better than any other CDN even though it’s free. With Hostgator, you can enable Cloudflare in seconds. You can even opt for full DNS integration on the Cloudflare network by changing your nameservers. This is more than good enough for any website. You don’t need to pay for a CDN.
In addition to Cloudflare, Hostgator has two other CDN options. Here are the three separate Hostgator CDN options:
| Hostgator CDN Plan | Paid? | Details |
|---|---|---|
| Cloudflare CDN | No | Free with all plans |
| WordPress Package CDN | No | Free with all WordPress packages |
| CDN with Hostgator SiteLock Essentials | Yes | Paid add-on |
Here’s an explanation of all three CDN options. Or you can skip directly to read about Hostgator’s WordPress CDN.
Best Hostgator Coupon for US Servers
For US-based customers, here is the definitive Hostgator coupon code page, with discounts as high as 78%. This coupon will give you the lowest price:
Duration: 36 months
Hostgator Coupon Code (Click to copy):

Table of Contents
How Cloudflare Benefits Hostgator Hosting
All Hostgator shared hosting plans need some kind of CDN to store JavaScript, CSS, and image files. This way, it reduces the load on your server, and this is especially important when you’re sharing server resources with other people. With a CDN, your visitors will receive the static files from locations close to them, which will speed up the delivery of your site. With Google now factoring in page experience as a ranking factor, this is something you can’t afford to ignore.
Cloudflare CDN integration is available by default on all Hostgator packages. Since you’re probably purchasing Linux web hosting with cPanel, you can simply select the Cloudflare icon in cPanel, and set up your integration with the click of a button.
Cloudflare offers two ways to integrate your web hosting:
- Through the hosting providers (easy)
- By manually changing your DNS records (advanced)
The first method is for those who don’t want to mess around too much. Your website will continue to use Hostgator’s servers. The second method is a bit more involved, but you use Cloudflare’s DNS servers instead, which I find to be faster than almost everyone else’s. You can read more about the comparison between the full and partial Cloudflare integrations below.
1. Cloudflare is Hostgator’s Free CDN
When enabled, Cloudflare acts as Hostgator’s CDN network. With it, you don’t need any other paid services like KeyCDN, etc. Even though Hostgator’s WordPress package comes with an in-built Hostgator CDN, I suggest you just use Cloudflare instead. It’s that good.
Don’t be fooled by the fact that Cloudflare is free. If you’re not using it, you’re doing yourself a major disservice. It’s the single best free tool that can speed up your site.
2. Cloudflare Caching Benefits Slower Hostgator Servers
The most basic (and greatest) benefit of Cloudflare is its CDN caching service. Believe me when I say that I’ve tried all of the popular paid CDNs, and they’re not as good as Cloudflare. I’m still a bit puzzled over how exactly they manage to offer such an amazing CDN for free, but they probably make up for it in their business tiers.
So what is caching? A webpage has a bunch of components – most of which are static files like images, Javascript, CSS, and fonts. Every time someone requests a page, these have to be downloaded onto their browser – most of the time, the same ones again and again. Cloudflare helps you by taking on the responsibility of serving these files from their servers. This reduces the load on your site and improves the response time from your Hostgator servers.
Cloudflare has three layers of caching as shown here:
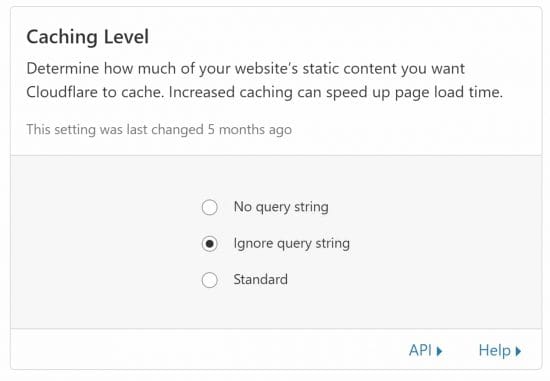
In addition, Cloudflare will serve your static files from servers that are closer to your visitors, regardless of where they are in the world. So in addition to helping your server, the user will also receive the static files much faster.
Every major website today uses a CDN. With Cloudflare on Hostgator, you get access to the very best CDN in the industry. For free!
Dynamic HTML Caching in WordPress
In 2020, Cloudflare introduced its Automatic Platform Optimization – APO – for WordPress. It’s a service where in addition to caching your static content like CSS, images, etc, they would also cache your dynamic HTML pages in conjunction with the Cloudflare WordPress plugin. Now this costs $5/m, so it won’t appeal to Hostgator customers who want cheap pricing. However, you can instead use the plugin called WP Cloudflare Super Page Cache to do the same thing for free!
Cloudflare is competing in this space with QUIC.cloud. Both are forms of CDN hosting that are capable of caching dynamic content. Right now, I still lean towards Cloudflare because of the firewall, page rules, and other services. But that could change in the future.
3. Use the Cloudflare DNS Instead of Hostgator
If you want, you can enable Cloudflare for your site even outside the Hostgator environment. This will allow you to use Cloudflare DNS servers instead of those provided by Hostgator. I like doing this because Cloudflare’s servers are typically much faster compared to those run by web hosting sites. I’ve tested the DNS response times of services like SiteGround and found a huge difference.
You can see in the screenshot below, that I’ve configured Cloudflare to manage my DNS:
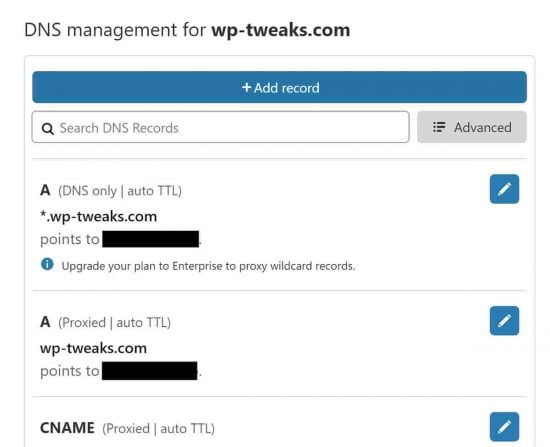
Since DNS lookups are constant each time a user visits your site, the improved response time from DNS lookups provide an immediate benefit to your website speeds. The difference is noticeable!
4. Free Firewall Rules
Cloudflare also allows you to configure firewall rules to protect your site. For example, I’ve blocked all XMLRPC requests to WP-Tweaks as shown here:
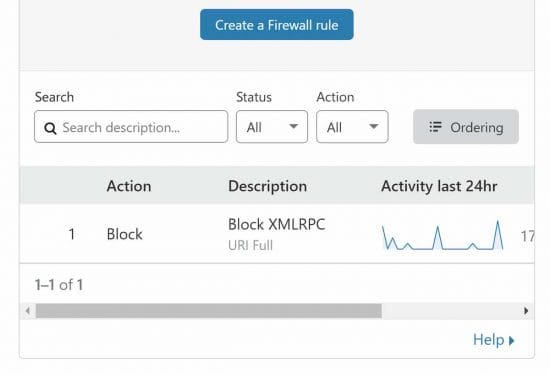
The benefit of doing this via Cloudflare is that it doesn’t place any additional burden on your site. Your Hostgator server doesn’t need to waste time filtering requests, running them through the processor, and deciding what response to send. Cloudflare intercepts requests and does the heavy lifting for you. So you don’t need to worry about a DDoS attack from that vector.
5. Assorted Tools and Benefits
In addition to the above concrete benefits outlined above, Cloudflare also has a huge list of settings that you can play around with. For example, I’d noted earlier that they’re signing on to the QUIC protocol, and you can join the waitlist for that. Similarly, they have settings for compression, minification, etc.
They’ve even teamed up with some web hosts to provide the “Railgun” service. Hostgator hasn’t signed for this service yet, however. But it’s not a huge deal since I’ve found it to be rather buggy in any case. I’ve personally turned it off even though I have the option to use it.
How to Install Cloudflare on Hostgator
Ever since Hostgator and Cloudflare tied up in 2010, users can just enable Cloudflare integration from the Hostgator cPanel. There’s no complicated setup.
However, if you want to get the full benefits of Cloudflare like the fast DNS servers, you need full Cloudflare integration. That means changing your DNS nameservers to point to Cloudflare instead of Hostgator. To do this, follow this guide on adding a new account to Cloudflare. Once you’ve done this, you’ll notice an immediate speed increase due to the faster DNS lookups and you can also start implementing page and firewall rules to improve your site’s loading speed.
Full vs Partial Cloudflare/Hostgator CDN Integration
There are two ways you can integrate Hostgator with Cloudflare:
- Partial integration via cPanel
- Full integration by changing your DNS nameservers
Here are the pros of each approach:
Partial Cloudflare CDN Integration Pros
- Easy to set up
- Can manage directly from Hostgator
- Hostgator support can help you if needed
Cons of Partial Integration
- You still use Hostgator Nameservers
- Limited functionality
Full Cloudflare CDN Integration Pros
- Faster DNS servers
- Access to full functionality
- Access to the firewall, page rules, and more
Cons of Full Integration
- More complex setup – requires a DNS change
- No support from Hostgator
On the whole, I prefer full integration of Cloudflare with Hostgator. The additional DNS lookup speed is worth it all by itself. Also, features like page rules and advanced firewall protection are indispensable for me. But if you’re not comfortable changing nameservers and doing related tech stuff, I would advise against it.
Minor Downside: No Railgun Integration
However, Hostgator doesn’t appear to be a Cloudflare Optimized Partner with access to Railgun – Cloudflare’s service for speeding up the delivery of dynamic content. But my personal experience with Railgun has been very iffy. Whenever I’ve tried Railgun, my server response times have spiked, and I typically get worse performance.
So I don’t think this is a big deal. You’ll do just fine without Railgun as long as the rest of your site is optimized.
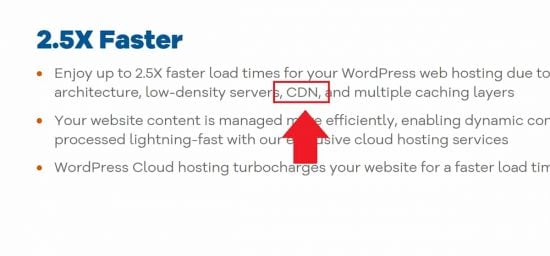
The Hostgator Global CDN with WordPress
While most Hostgator plans will use Cloudflare, Hostgator does have a global CDN that customers can use. But not just any customer. Only those who sign up for the Hostgator WordPress plan. This is a special kind of hosting that brings all sorts of benefits if you’re on WordPress such as:
- Cloud architecture
- SSD drives
- CDN
- Malware detection and cleaning
- Automatic updates
- Streamlined dashboard
The Hostgator CDN benefit is mentioned on their WordPress hosting page as shown here:
This is the only reference to CDNs on the Hostgator website for any kind of hosting package. WordPress users can preferential treatment, and I think that Hostgator has one of the best affordable WordPress packages on the market. There are others of course, like Kinsta and Liquid Web, but they fall into the more “premium” slots.
Paid CDN with SiteLock
You can also get a CDN by purchasing the SiteLock add-on from Hostgator. This is part of the SiteLock Hostgator Essentials plan and includes more than just a CDN. You also get malware scanning, the blocking of automated bots, image compression, and elevated ticket response times.
However, for what it offers, I think that Hostgator SiteLock is not worth it. I prefer the Cloudflare CDN over the dedicated one provided by SiteLock. And Cloudflare has pretty advanced DDoS capabilities. Overall though, if you’re looking for security features I suggest you choose something like NameHero instead. Here’s a complete NameHero review that explains all the features. Once you factor in the cost of add-ons like SiteLock and backup solutions, the cost evens out.
Bottom Line: Use the Free Hostgator CDN
In short, unless you’re on the WordPress plan, you should be using the built-in Hostgator CDN with Cloudflare. And personally, just between us, I think Cloudflare is superior to the actual Hostgator CDN as well. Don’t let the “free” tag fool you. I’ve been web hosting since 2008, and I’ve tried everything. Nothing beats Cloudflare!
Thanks for your post. Please I am on hostgator but how do i upload my javascript files to the Hostgator-Cloudflare CDN and use it ? I do not see CDN anywhere in my cpanel
You don’t need to explicitly upload your JavaScript files to Cloudflare. Just enable Cloudflare and the files will be uploaded automatically on the first load.