
The Cache-Control header controls how Cloudflare treats cached assets, along with others like”Vary” and “Expires”. But with cache-control, you don’t need to add an expires header with Cloudflare since the latter overrides the former. Here’s how to modify the cache-control response header using Cloudflare transform rules.
Table of Contents
1: Get the URL Pattern to Change the Cloudflare Cache-Control Header
For this example, I want to set the cache-control header for all public-facing HTML pages. Since all my pages end with “/”, here are rules for the URL whose cache-control I want to set:
- URL must end with “/”
- URL cannot contain “wp-admin”
- URL cannot have “wp-includes”
I have to be careful since I don’t want to cache an internal WordPress admin page accidentally. Make sure you determine the URL rules tightly to avoid caching stuff you don’t want.
2: Set a New Cloudflare Transform Rule
In the Cloudflare dashboard for your site, go to “Rules -> Transform Rules”. Click “Create transform rule” as shown here:
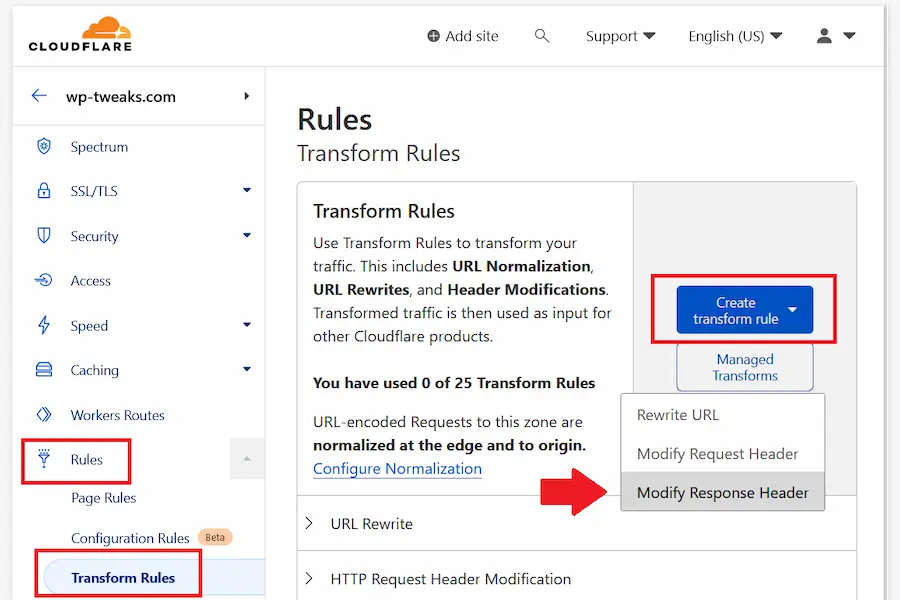
In the drop-down box, click “Modify Response Header”.
3. Add a Static Cache-Control Response Header for your URLs
First, give your new rule a name you can identify in the future. Next, under “When incoming responses match”, create the rules you determined in step 1:
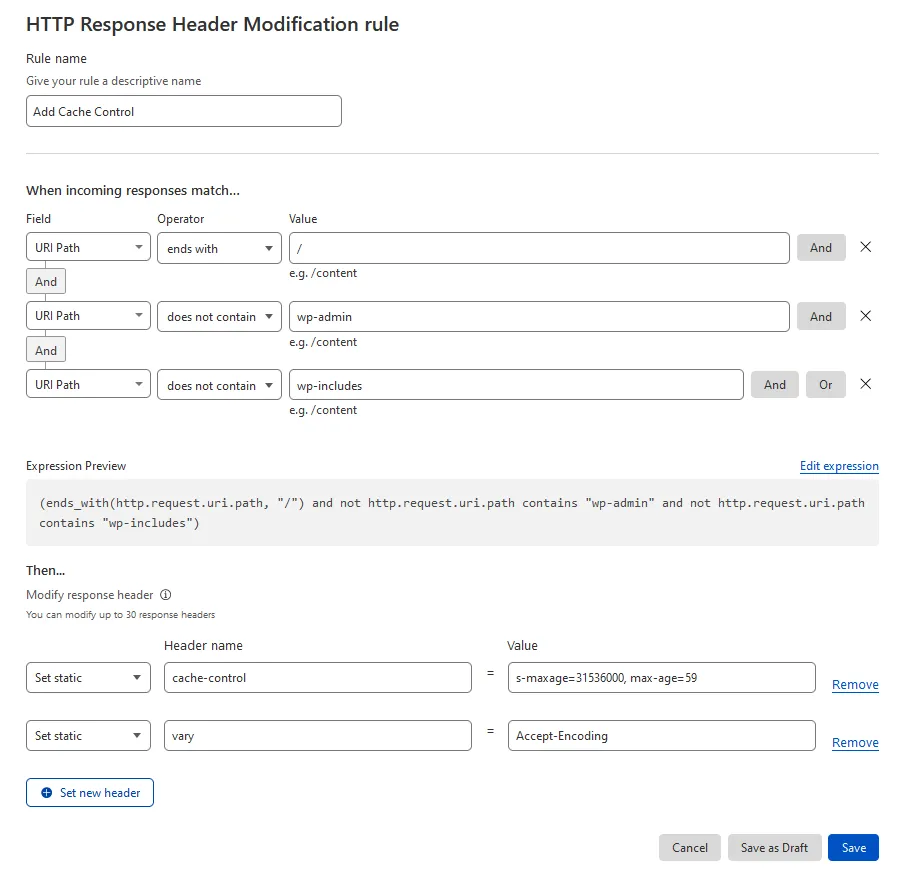
In the above example, I’ve chosen the “ends with” operator to specify that I want this rule to only apply to URLs that end with “/”. I’ve also used the “And” operator to exclude URLs containing “wp-admin” and “wp-includes” to be on the safe side.
Finally, under “Then”, do the following:
- Choose “Set static” from the first box
- Under “Header name” type “cache-control”
- Under “Value”, enter the value you want to set for the cache-control response header
In addition to cache-control, I’ve also asked Cloudflare to modify the “Vary” header, so it doesn’t interfere with caching.
3. Check the Cloudflare Cache-Control Response Header
After saving your changes, let’s check to see that Cloudflare has modified the Cache-Control on the pages we want. Open your browser and pull up the developer pane by pressing “Ctrl + Shift + C”. Open the “Network” tab and load a page while the tab is open. In the pane, click the first line containing the URL, and under “Headers” on the right-hand side, check the cache-control header as shown here:
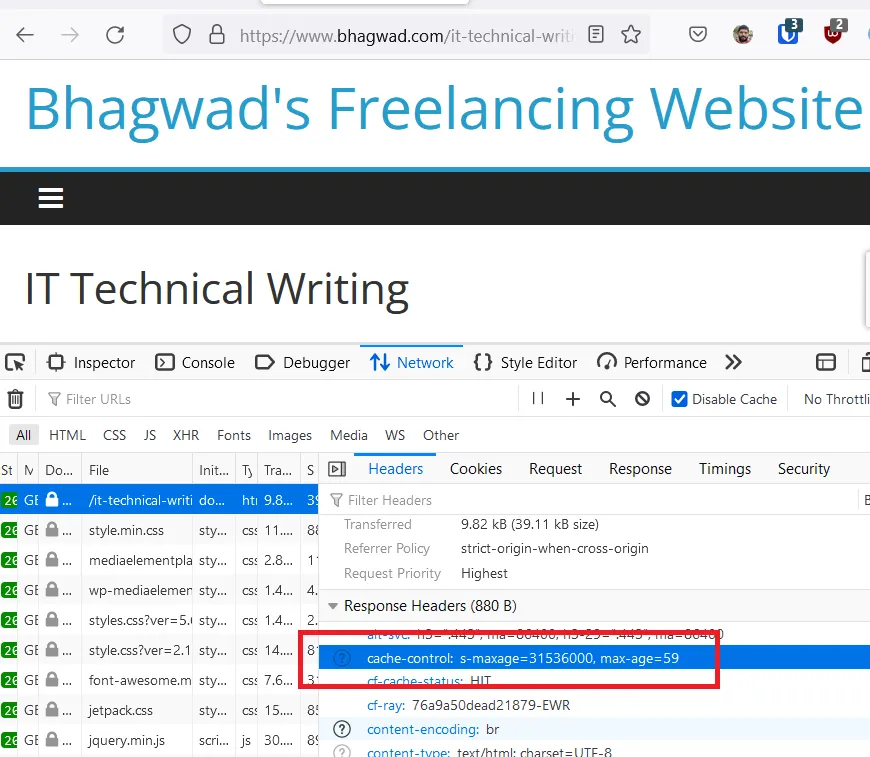
As you can see, Cloudflare has modified the cache-control header as expected. Now load some pages where you don’t want Cloudflare to change the headers and make sure that the Transform rules aren’t working. It’s equally important (if not more important) to ensure that Cloudflare isn’t messing with pages you want it to leave alone.
No Need to Add an Expires Header with Cloudflare
If you add a cache-control header as explained above, you don’t need to set an expires header with Cloudflare. This is because as per the expires header documentation, if the cache-control header sets the max-age or s-maxage directive, then the browser ignores the expires header.
While you could try and add an expires header with Cloudflare using the technique above, you have to set the date, and that’s problematic. While we have access to Cloudflare’s http.request.timestamp.sec variable, the expires header needs to be set in a specific format, and I don’t know how to convert the integer seconds with a dynamic expression. Maybe it can be done, but there’s no use trying when the cache-control header overrides the expires header.
For even further optimization, you can instruct Cloudflare to serve stale content so that your visitor doesn’t have to wait for the request to come from the origin.
Modifying the Cache-Control Headers Helps with Ezoic’s Loading Speed
As an ad network that inserts ads into your website, Ezoic is really slow. Even though they have a setting allowing you to override your default cache-control and vary headers, it doesn’t always work, particularly with caching enabled. But using the Cloudflare transform rules, you can modify the cache-control and vary headers so that Ezoic’s servers cache your content with the ads enabled.
Using Cloudflare to Modify Cache-Control is Better than Using Plugins
There are many ways to modify the cache-control response header. In WordPress, you can download plugins to change response headers, but Cloudflare’s transform rules are a much better way to achieve the same effect. For example, I use Cloudflare to add a noindex X-Robots-Tag instead of a plugin or changing my .htaccess file.
For one, Cloudflare has a much nicer interface to create URL patterns, not to mention being able to combine them with “AND” and “OR” statements so that you precisely target only those URLs you want. No more fiddling with messy regex expressions and potentially breaking your site.
Another advantage is that it takes away the load from your server since all the heavy lifting is done entirely by Cloudflare’s robust infrastructure. This, along with using Super Page Cache for Cloudflare and the excellent new Cache Reserve functionality, will keep your site’s load manageable.
Great work.
Congratulations.
Great work.
Congratulations.
I have been using cloudflare cache for years, I just saw this, let’s see if it will extend the cache.